
- Published on
FIDO2 Passwordless Authentication With Keycloak - Part 1

- Authors
- Name
- Amrut Prabhu
- @amrutprabhu42

This is a two-part article on understanding and implementing FIDO2 passwordless authentication with Keycloak
In this article, we will be exploring how passwordless authentication works between the client and the server. In my next article “FIDO2 Passwordless Authentication With Keycloak — Part 2”, we will explore how we can implement it in Keycloak.
Introduction
The FIDO2 (Fast IDentity Online) standard allows for replacing weak password-based authentication with strong hardware-based authentication using private and public key (asymmetric) cryptography.
FIDO2 is the latest set of specifications from the FIDO Alliance. It enables using common devices to authenticate with online services on both mobile and desktops, using unique cryptographic login credentials for every site.
FIDO2 is comprised of two standardized components.
- Web API (WebAuthn)
- Client to Authenticator Protocol (CTAP).
The two work together and are required to achieve a passwordless experience for login.
WebAuthn is the main component of FIDO2. It is a set of standards and APIs that allows a browser to communicate with the operating system to deal with cryptographic keys. WebAuthn is however developed by the W3C and the combination of FIDO with WebAuthn brings in FIDO2.
With FIDO2 you can combine hardware-based authentication with an additional factor such as a PIN or fingerprint. The purpose of the PIN or fingerprint would be to unlock the Security Key so it can perform cryptographic tasks. This PIN or fingerprint is stored locally on the device and would never be sent across the network.
How does FIDO2 Passwordless Authentication work?
Let's look at the interaction between the client and the server during registration

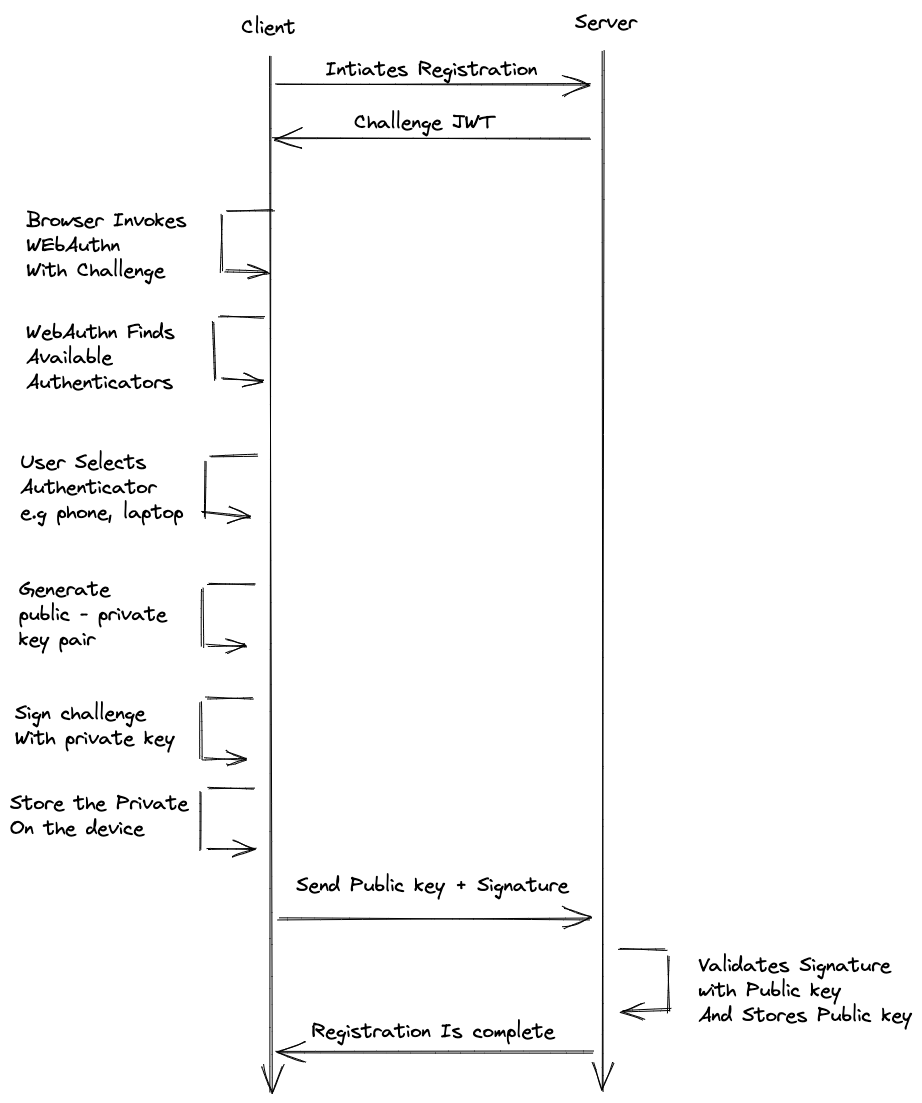
As you can see in the diagram, the client initiates a registration process with the server which returns a challenge JWT. The WebAuthn APIs implemented in the browser find the available authenticators and asks the user to select an authenticator. This could be your phone or the laptop itself.
Once the user selects an authenticator, WebAuthen then generates a public and private key pair by communicating with the operating system. It then signs the challenge with the private key to generate the signature, stores the private key on the client’s device, and then sends over the public key and the signature to the server.
The server then validates the signature using the received public key and stores the public key along with registration.
Now let's look at how the authentication flow works.

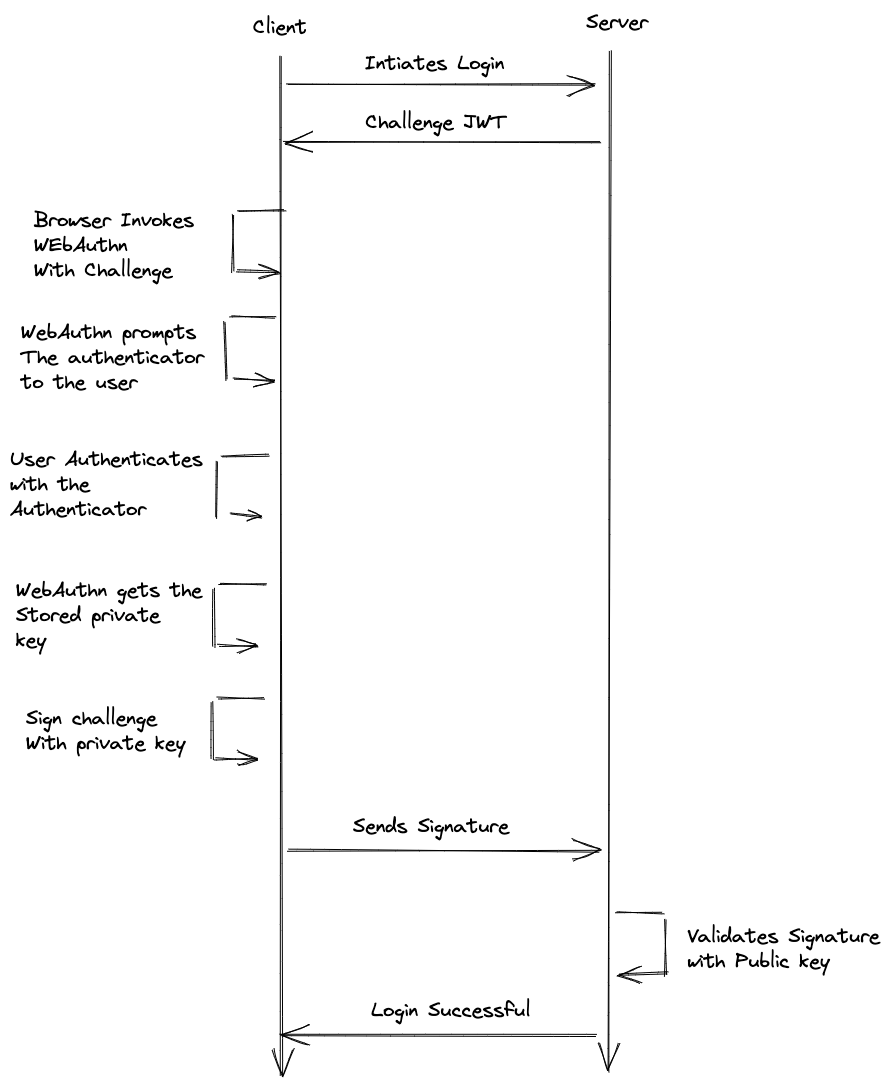
When the user wants to authenticate, the client initiates the login, and the server now sends a challenge JWT.
The browser then invokes the WebAuthn API with the challenge, which then prompts the user with the authenticator with which the user can authenticate.
On selecting the authenticator and granting access using either the pin or fingerprint, the WebAuthn API now gets the private key that was stored previously on the device.
Using this private key, it now signs the challenge JWT and sends the signature to the server.
On the server side, the server finds the appropriate public key of the user which was provided during registration, and verifies the signature. If the signature is valid, it allows the login to be successful.
Next...In my next article, We will look into how we can set up FIDO2 passwordless authentication using Keycloak .
If you’re looking for more articles to expand your knowledge of software development, here are three additional recommendations:
- Spring Boot: AWS RDS JDBC password rotation without restarting.
- Spring Cloud Stream With Kafka.
- Caching with Spring Cache and Ehcache 3.
I keep exploring and learning new things. If you want to know the latest trends and improve your software development skills, then subscribe to my newsletter below and also follow me on Twitter.
Enjoy!!