
- Published on
How to Search & Query Redis with A Spring Boot Application

- Authors
- Name
- Amrut Prabhu
- @amrutprabhu42

Introduction
Redis is an open-source, in-memory data structure store that provides key-value storage. It offers various features such as caching, pub/sub messaging, and data persistence.
Redis works really well at high-performance operations due to its in-memory nature, allowing it to deliver rapid data retrieval and storage. It supports many data structures like strings, lists, sets, hashes, and sorted sets, making it useful for different use cases.
You must have heard that Redis is used as a cache layer to enhance the performance of applications but it can also be used as a message broker for real-time communication, or as a primary data store for small to medium-sized datasets. Its simplicity and speed make it suitable for applications that require fast data access and real-time processing.
Now we will be using Redis Stack which extends the core functionalities of Redis to provide features like searching, querying across hashes, querying JSON documents, etc. You can read about it here.
We will look at how we can use Redis Stack with a Spring Boot Application and see how we can query a particular field and then look at using the search feature.
Creating a Spring Boot Application with Redis Stack
Let’s go to https://start.spring.io and create a new application with only a single Spring-boot-starter-web dependency.
We only need this to create some REST endpoints.
If you are going to be using the Spring Boot 3.1 version, then you can also add the spring-boot-docker-compose dependency that will start your docker-compose file on application startup.
If you are curious to know how docker compose works with Spring Boot 3.1 you can read about it here.
Next, we will add the redis-om-spring dependency which provides us the capabilities for searching on a field and also full-text search capabilities.
 <dependency>
   <groupId>com.redis.om</groupId>
   <artifactId>redis-om-spring</artifactId>
   <version>0.8.2</version>
  </dependency>
Now, let's create a model that we would like to store as a Redis Hash.
@RedisHash
public class Person {

    @Id
    private String id;
    @Indexed
    private String name;

    @Searchable
    private String lastName;

// getters and setters
Here, we define a Redis Hash of the type Person. It has an Id field that is used to identify the key.
The name field is marked with the @indexed annotation to allow searching on the name field. This is not the full-text search mechanism but you can match a record based on the exact text value.
The LastName field is marked with @searchable annotation which now marks that this field is searchable as a text search.
So now let's create a repository for storing and retrieving keys from the Redis store.
@Repository
public interface PersonRepository extends CrudRepository<Person, String> {

    Optional<Person> findByName(String name);
    Optional<Person> searchByLastName(String name);
}
Here we have two methods.
One is for finding by the name and the other one will help in searching last names as a text-based search.
Now for the autoconfiguration to take over creating this repository, we will have to put the annotation EnableRedisEnhancedRepositories .
@EnableRedisEnhancedRepositories(basePackages = "com.amrut.prabhu")
@SpringBootApplication
public class SpringBootWithRedisApplication {

 public static void main(String[] args) {
  SpringApplication.run(SpringBootWithRedisApplication.class, args);
 }

}
With this let's create some endpoints that will allow us to store and retrieve the values from Redis.
@RestController
public class WebController {

    private PersonRepository personRepository;

    public WebController(PersonRepository personRepository) {
        this.personRepository = personRepository;
    }

    @PostMapping("/person")
    public Person save(@RequestBody Person person) {
        return personRepository.save(person);
    }

    @GetMapping("/person")
    public Person get(@PathParam("name") String name, @PathParam("searchLastName") String searchLastName) {
        if (name != null)
            return this.personRepository.findByName(name)
                    .orElseThrow(() -> new RuntimeException("person not found"));

        if (searchLastName != null)
            return this.personRepository.searchByLastName(searchLastName)
                    .orElseThrow(() -> new RuntimeException("person not found"));

        return null;
    }
Here, the Post mapping helps us to save the data while in the Get mapping, we provide two query parameters.
The query parameter name will query based on the field name while the searchLastName will help us to query the field last name as a text-based search.
Next, let’s start Redis Stack with docker compose.
Redis Stack with Docker Compose
We will create a docker-compose file that will start Redis Stack along with a browser-based client called Redis Insight to communicate with Redis.
version: '3'
services:
  redis:
    image: redis/redis-stack
    ports:
      - 6379:6379

  redis-insight:
    image: redislabs/redisinsight:latest
    ports:
      - 8001:8001
Let's start the application, and since we are using the Spring Boot Docker Compose dependency this will also start docker compose file with it.
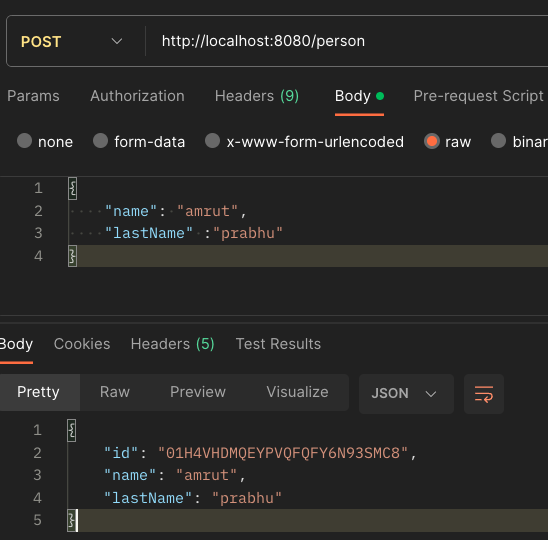
Now, let's make a request to store an entry.

Now, since we had an index created over the name field let's query it.

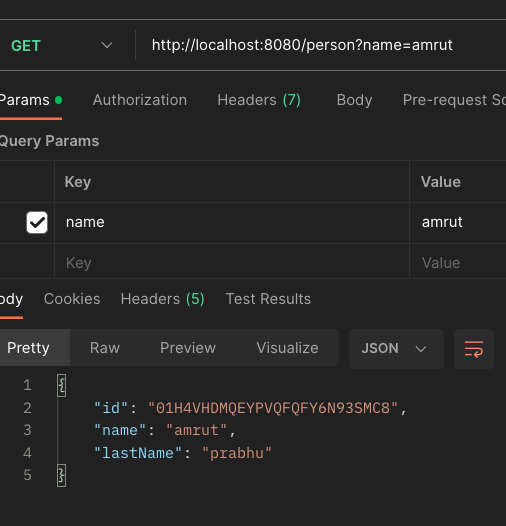
Now, remember this has to exactly match what is stored in Redis.
Now, since we provided search capability on the last name field, let’s create a simple text-based search.

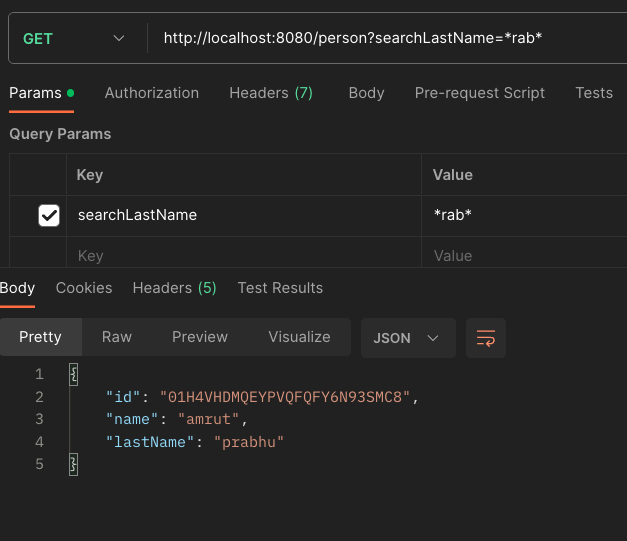
Make sure to at least provide 3 characters for the search to work.
With this, we were just able to store a Redis Hash entry and also retrieve it.
Let’s look at this in a visual approach using Redis Insight
Visualizing Redis Hash using Redis Insight
On accessing the URL localhost:8001, you will get to the interface of Redis Insight

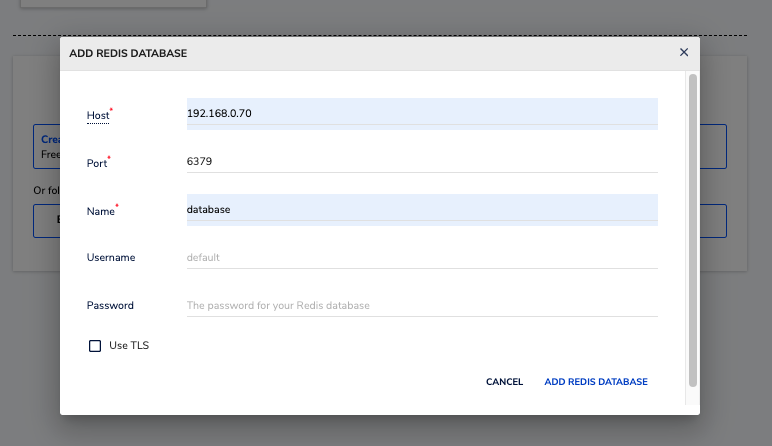
Add a database connection.
Remember, since we are running this using docker, Redis Insight doesn’t have access to our local host address. Hence you will have to use the IP address of your machine.


Now, this is data that we just stored.
The key is the entire class name along with an Id

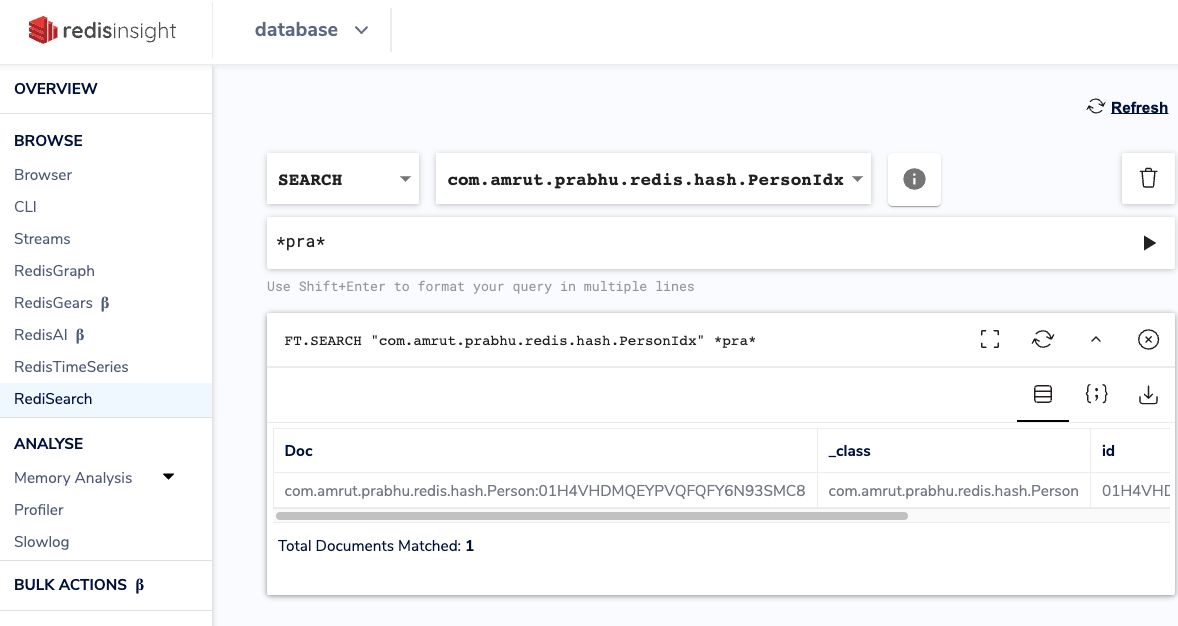
In the search section, you will be able to see the search index.
You can perform a simple search as I have done using *pra* .
Redis JSON Document Store
Redis not only stores key-value pairs but also JSON documents.
Now, to work with documents you just need to change the annotation from @redishash to @document and this will now store documents as JSONs in Redis.
@Document
public class Student {

    @Id
    private String id;
    @Indexed
    private String name;

    @Searchable
    private String lastName;
Along with this, you will have to add the @EnableRedisDocumentRepositoriesto initialize the repository
@EnableRedisDocumentRepositories(basePackages = "com.amrut.prabhu.redis.document")
@EnableRedisEnhancedRepositories(basePackages = "com.amrut.prabhu.redis.hash")
@SpringBootApplication
public class SpringBootWithRedisApplication {

 public static void main(String[] args) {
  SpringApplication.run(SpringBootWithRedisApplication.class, args);
 }

}
With this, you still get the same querying and searching capabilities as Redis Hash Here is how it looks like storing the above document in Redis using Redis Insight


Conclusion
With this walkthrough, we saw not only how we can store and retrieve a Redis Hash but also work with JSON documents.
You can find the entire code on my GitHub repo here.
If you are interested in learning more about Java and Spring Boot, here are some interesting articles to look at.
- Implementing GraphQL APIs in a Spring Boot
- Using DynamoDB with Spring Boot
- Remote Debug A Java Application In a Kubernetes Pod
I keep exploring and learning new things. If you want to know the latest trends and improve your software development skills, then subscribe to my newsletter below and also follow me on Twitter.
Enjoy!!