
- Published on
Spring Boot 3.1 Docker Compose Support

- Authors
- Name
- Amrut Prabhu
- @amrutprabhu42

Introduction
Spring Boot 3.1 was released on 18th May 2023. It included quite many features and one of them is the support for docker compose.
Today we will look at how we can use this.
Creating an Application
Go to https://start.spring.io and create a new project.
We will create a simple JPA application that communicates with MySQL.
For this, add the following dependencies.
- Spring Web ( only required to make REST endpoints)
- Spring Data JPA.
- MySQL Driver
Now, the new dependency that needs to be added is “Docker Compose Support”.
<dependency>
   <groupId>org.springframework.boot</groupId>
   <artifactId>spring-boot-docker-compose</artifactId>
   <scope>runtime</scope>
   <optional>true</optional>
 </dependency>
This dependency will help us start our docker-compose file when the application starts up.
After downloading the zip file and opening it, we would see already docker-compose file created for us.
Isn’t that incredible? 😃
Knowing that we added a MySQL dependency, the docker-compose file was already ready with the MySQL docker image.
services:
  mysql:
    image: 'mysql:latest'
    environment:
      - 'MYSQL_DATABASE=mydatabase'
      - 'MYSQL_PASSWORD=secret'
      - 'MYSQL_ROOT_PASSWORD=verysecret'
      - 'MYSQL_USER=myuser'
    ports:
      - '3306'
Now let's store some data in the database.
Storing Data In Mysql with JPA
Let’s create a simple model class
@Table
@Entity
public class Model {


    @Id
    @GeneratedValue
    private int id;

    @Column(name = "name")
    private String name;

}
And create an endpoint to accept data and store it in the database.
@RestController
public class WebController {

   @Autowired
   private ModelRepository modelRepository;

   public WebController(ModelRepository modelRepository) {
       this.modelRepository = modelRepository;
   }

   @PostMapping("/")
   public Model add(@RequestBody Model model) {

       return modelRepository.save(model);
   }
}
We will use the same model class to be parsed from the REST endpoint to the database. But it's always a good practice to always have a DTO (Data Transfer Object).
Now, let’s start the application.
Starting the Application With Docker Compose
On starting the application and making a REST request we are able to store the information in the database.

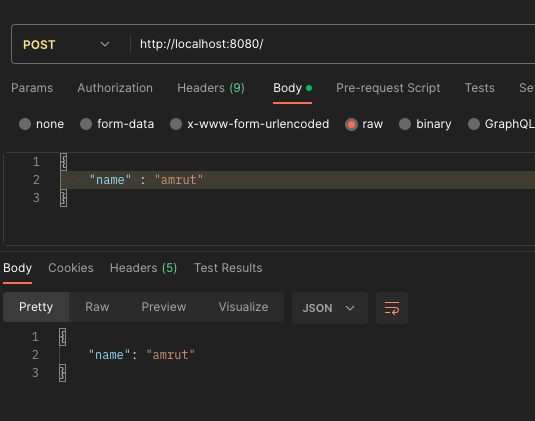
But wait, we dint give any configuration properties to set up connections with the database. 🤔
That’s the beauty of this docker compose support dependency.
It automatically starts the docker compose file, and it knows what are the properties set in the file and creates connections for our application.
The only property we have to set is to ally Hibernate to create the DDL statements.
spring:
  jpa:
    hibernate:
      ddl-auto: create
Here are the application logs


If you’re interested in exploring more articles related to software development, here are three more recommendations:
- Spring Boot With MongoDB
- Spring Boot On AWS Lambda with Snap Start
- Externalizing Application Configuration With Spring Cloud Config
I keep exploring and learning new things. If you want to know the latest trends and improve your software development skills, then subscribe to my newsletter below and also follow me on Twitter.
Enjoy!!