
- Published on
Deploy Application on Kubernetes with Helm, JIB, and Skaffold


- Authors
- Name
- Amrut Prabhu
- @amrutprabhu42

In this article, we will explore how we can build and deploy a Spring Boot Application using Skaffold. We would use the JIB plugin to create a docker image and a helm chart with the deployment YAML files. Finally, we will see how we can continuously deploy changes while we develop our application in development mode.
Introduction
With Kubernetes fast spreading among many companies as a container orchestrator, many tools have been developed to create and deploy container images on a Kubernetes environment.
One such tool is Skaffold and we will look at how you can create a pipeline to build and deploy your application on a Kubernetes Cluster.
Creating An Application
Let’s go to https://start.spring.io and create a simple application with a web dependency.
We would then implement a controller that will serve a single endpoint that returns us a static string.
@RestController
public class WebController {

    @GetMapping("/")
    public String getValue() {
        return "Yes! it works";
    }
}
Now, to build our docker image, we will be adding Google’s JIB plugin to the build section.
<plugin>
    <groupId>com.google.cloud.tools</groupId>
    <artifactId>jib-maven-plugin</artifactId>
    <version>3.3.1</version>
    <configuration>
        <from>
            <image>openjdk:17</image>
        </from>
     </configuration>
</plugin>
Here, we are specifying the base image that is openjdk:17.
If you want to learn different ways for creating Docker images using maven, you can read my article here.
With this let’s create a helm chart.
Creating a Helm Chart
Creating a Helm chart is as simple as running the following command.
helm create rest-service
This will create a Helm chart with the name “rest-service” with some resource definitions like deployment, service, ingress, and service account.
This chart will work with Skaffold, but we will make it a bit simpler, by deleting the service account and ingress resource YAMLs.
We will have a deployment resource YAML, with a container port set to 8080, labels, and an image placeholder.
apiVersion: apps/v1
kind: Deployment
metadata:
  name: rest-deployment
spec:
  selector:
    matchLabels:
      service: rest-service
  template:
    metadata:
      labels:
        service: rest-service
    spec:
      containers:
        - name: { { .Chart.Name } }
          image: '{{ .Values.image.repository }}:{{ .Values.image.tag | default .Chart.AppVersion }}'
          imagePullPolicy: Always
          ports:
            - name: http
              containerPort: 8080
              protocol: TCP
          livenessProbe:
            httpGet:
              path: /
              port: http
          readinessProbe:
            httpGet:
              path: /
              port: http
          resources: { { - toYaml .Values.resources | nindent 12 } }
Next, we will have a service resource to access the service within the cluster.
apiVersion: v1
kind: Service
metadata:
  name: rest-svc
spec:
  type: ClusterIP
  ports:
    - port: { { .Values.service.port } }
      targetPort: http
      protocol: TCP
      name: http
  selector:
    service: rest-service
You can always include all the resources in the Helm chart, but just to keep things simple we are only including the deployment and the service resource.
With all of this, we are finally now going to define a Skaffold pipeline.
Creating A Skaffold Pipeline
To create a Skaffold Pipeline, we will need to install the Skafflold CLI from here.
Once you install it, we can run the following command in the project directory.
skaffold init
This will scan the files in the directory, read the pom file to detect the JIB plugin, and the Helm chart directory to find the Helm chart.
Once the CLI finds these files, it will prompt you to choose how you want to build the application as shown below.


Selecting JIB maven plugin and confirming the option will create a skaffold.yaml file.

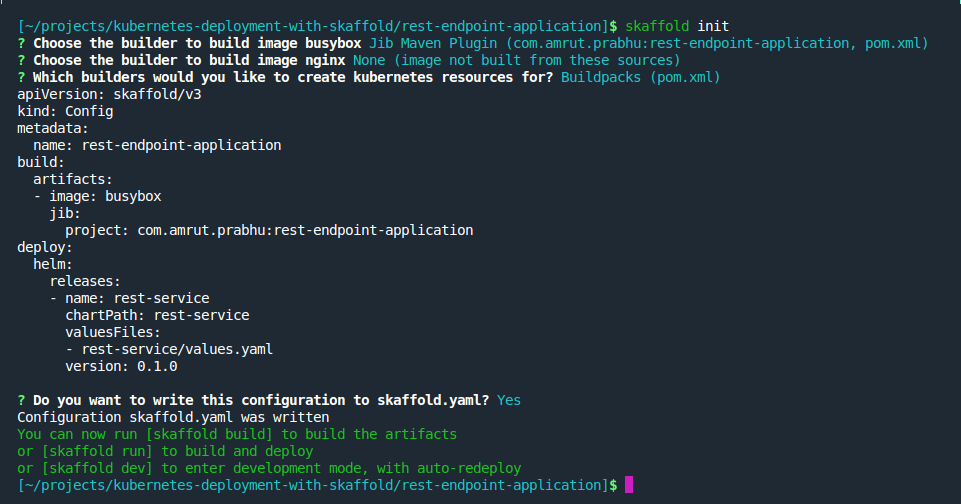
You can see in the output above, it will build the image with the name “busybox”. We will update this name to include my GitHub image repository.
apiVersion: skaffold/v3
kind: Config
metadata:
  name: rest-endpoint-application

build:
  artifacts:
    - image: ghcr.io/amrutprabhu/skaffold-jib-image
      jib:
        project: com.amrut.prabhu:rest-endpoint-application

deploy:
  helm:
    releases:
      - name: rest-service
        chartPath: rest-service
        valuesFiles:
          - rest-service/values.yaml
        version: 0.1.0
Let’s understand the various parts
Under the build section, you can define how you want to build your artifact. Since we are using JIB, we are adding the project reference which was automatically detected and added.
Skaffold also supports building from DockerFile, Cloud Native WebPacks, and by defining custom scripts. You can read about it here.
Next, under the deploy section, we are making use of the Helm way of deploying the built image and hence we specify the Helm chart path relative to the skaffold.yaml file.
Now, this is the most simple pipeline to get you up and running. You can always add more stages to the pipeline like tests, custom tagging, etc.
With these changes, we will deploy our application on a Kubernetes cluster.
Using Skaffold Pipeline For Deployment
Now, I would be using the K3s cluster on my machine but you can use any Kubernetes cluster, either local or remote. Just we have to make sure you are able to communicate with the cluster using kubectl command.
To start the entire pipeline, we will be using the following command
skaffold run --port-forward --tail
We are adding these two options to port forward the service port and also tail on the pod logs.

As you can see above, we are able to access the service using the port forward port.
Using Skaffold in Development Mode
Skaffold provides this mechanism to actively deploy your changes while you write code.
For this, you have to run the dev command which will monitor changes in the files, retrigger the build, push the image and deploy the application
skaffold dev --port-forward --tail

Conclusion
We saw how we can create a Skaffold pipeline to build our docker image and then deploy it on a Kubernetes cluster. We can also use the development mode to continuously deploy our changes while we update our code.
You can find the code on my GitHub repo here.
I keep exploring and learning new things. If you want to know the latest trends and improve your software development skills, then subscribe to my newsletter below and also follow me on Twitter.
Enjoy!!