
- Published on
Create Network Problems With Toxiproxy

- Authors
- Name
- Amrut Prabhu
- @amrutprabhu42

Introduction
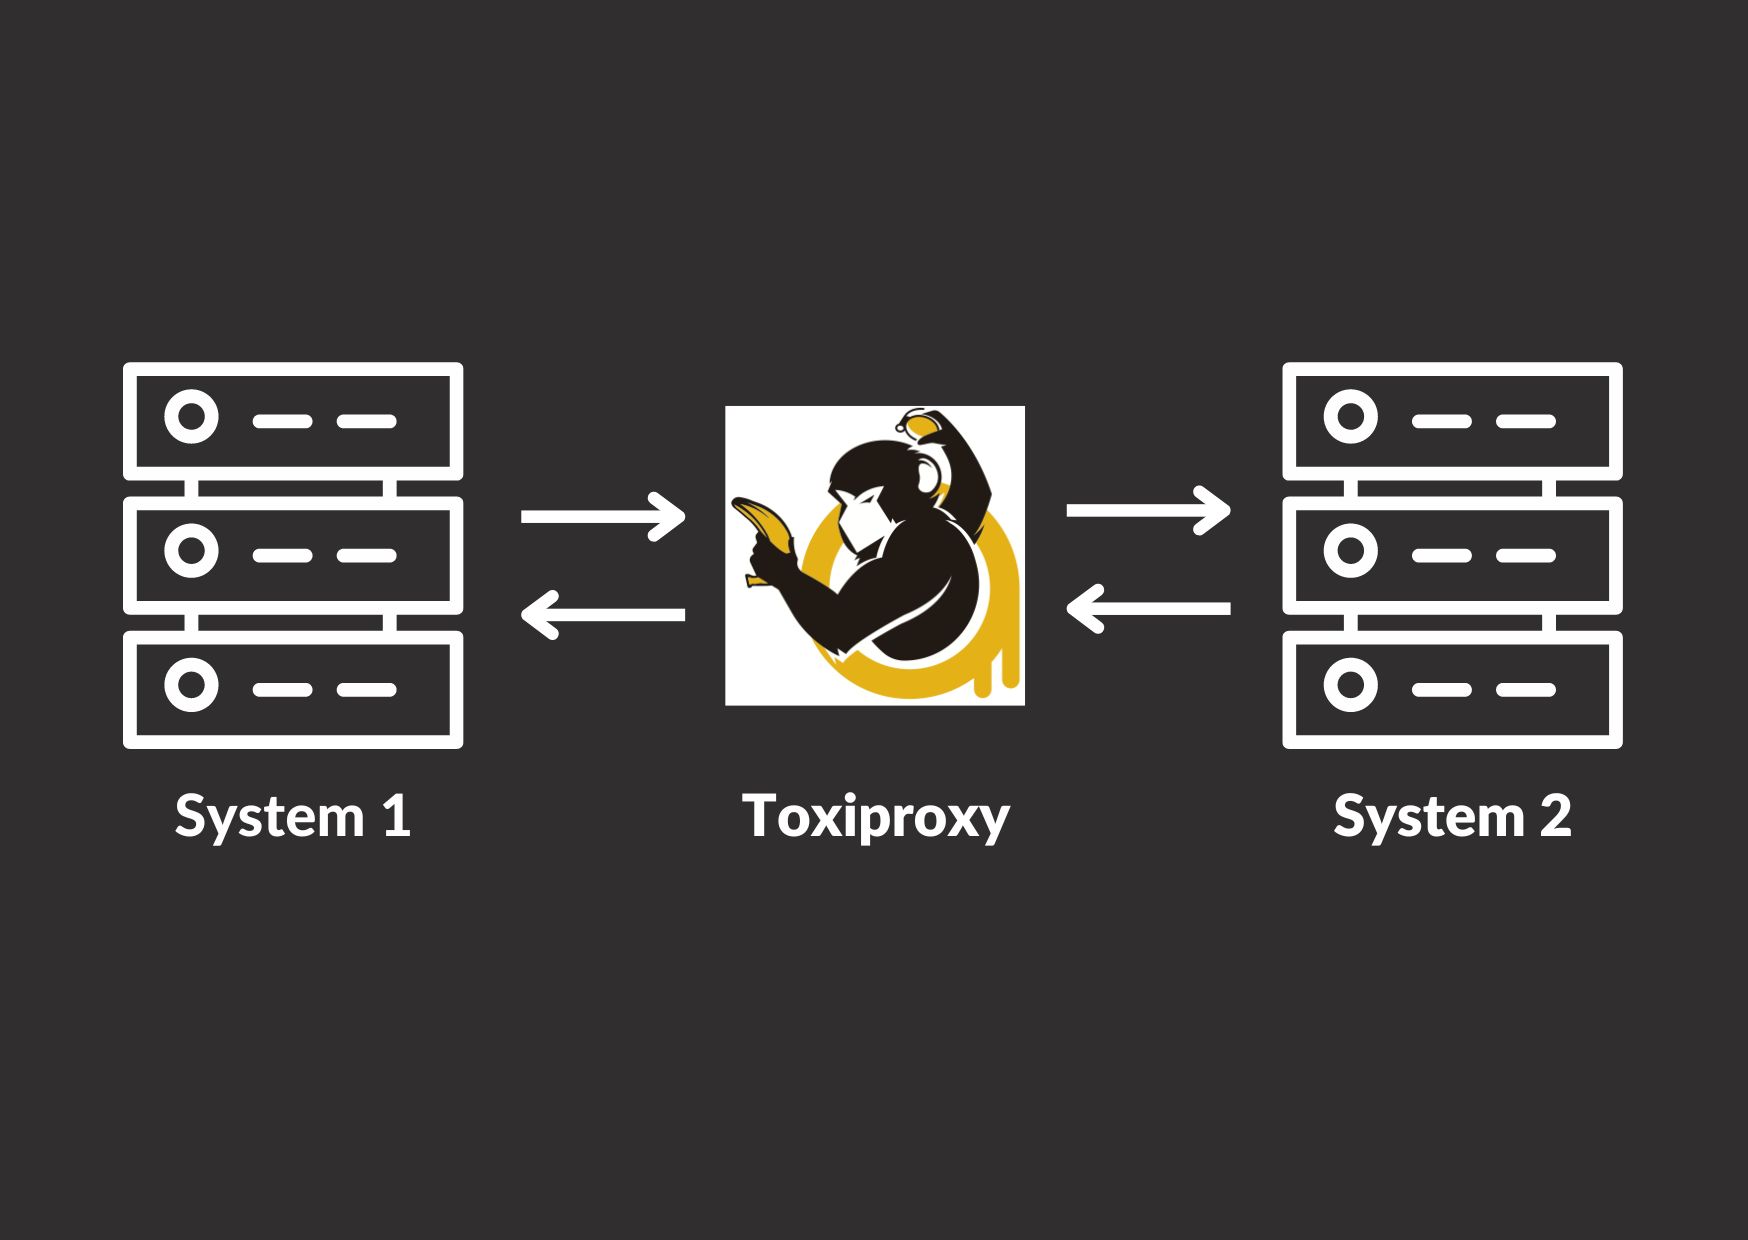
In modern software architecture, systems communicate with each other over the network. No matter if it is synchronous or asynchronous communication, handling and dealing with communication errors can be very difficult. The main reason is that it is not easy to reproduce these communication problems.
Today we will look at a tool called Toxiproxy with which you can simulate a wide variety of network-related problems.
Creating An Application
Let’s create a simple application that provides a single endpoint that communicates with the database to fetch some data.
For this, we will create a Spring Boot application from https://start.spring.io and add the following dependencies
- Spring Data JPA
- Spring Web
Once we generate the project, we will add a controller that fetches all the posts from the database.
@RestController
public class WebController {
    private final PostRepository postRepository;
    public WebController(PostRepository postRepository) {
        this.postRepository = postRepository;
    }

    @GetMapping("/blog")
    public List<BlogPost> get(){
        return postRepository.findAll();
    }
Now, let's add some properties to communicate with the database.
spring:
  datasource:
    url: jdbc:mysql://127.0.0.1:13306/database
    username: user1
    password: password
Here we specify port 13306, which is going to be our proxy port.
Now, let’s start our database using docker-compose
version: '3.8'
services:
  mysql:
    image: mysql/mysql-server:5.7
    ports:
      - 3306:3306
    environment:
      MYSQL_ROOT_PASSWORD: password
      MYSQL_DATABASE: database
      MYSQL_USER: user1
      MYSQL_PASSWORD: password
Here, if you see, we are exposing port 3306 for the MySQL container.
Now, let's create a proxy with Toxiproxy
Starting Toxiproxy
Before we create a proxy, we need to start the Toxiproxy server.
We can start a Toxiproxy server using docker but if you want you can also install the Toxiproxy CLI from here to start the server.
docker run --rm \
--net host \
-p 8474:8474 \
ghcr.io/shopify/toxiproxy
With the server running it's time to create our proxy to the database.
For this, we will run the following command.
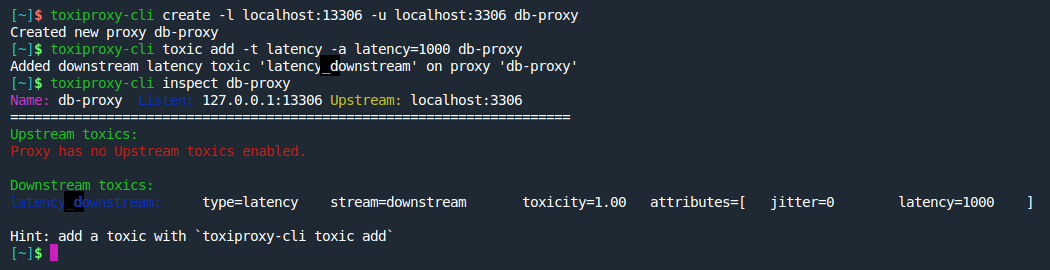
toxiproxy-cli create -l localhost:13306 -u localhost:3306 db-proxy
You can also run all commands without installing the CLI and execute it with docker as shown below
docker run --rm \
--net host \
--entrypoint="/toxiproxy-cli" \
-it \
ghcr.io/shopify/toxiproxy \
create -l localhost:13306 -u localhost:3306 db-proxy
This will create a proxy for us at port 13306 communicating with the upstream database service at 3306.
With this, we can now start our application and communicate with the database via the proxy.
Let’s look at how much time it takes to get a response for the endpoint to communicate with the database via the proxy.


Introducing network problems
Let’s look at how we can introduce some network problems.
Toxiproxy has this concept of toxics, that you can add to the proxy to introduce some network-related issues.
We will start with the simplest one i.e latency in the connection while fetching data.
toxiproxy-cli toxic add -t latency -a latency=1000 db-proxy
When we execute this, we are adding a latency of 1000ms to the downstream connection (default stream option) with toxicity of 1.0 (default). Toxicity refers to the probability of applying the toxic

Let’s now try to access the same endpoint from before and see how long it takes to get a response.

So as you can see, it took quite some time to get a response.
This is just one type of latency we introduced. We can also add a jitter to introduce irregular packet flow.
Toxiproxy supports quite number of toxics, like timeout, peer connection reset, data limits, etc and you can find all of them here.
Finally, we can remove the toxic with the following command.
toxiproxy-cli toxic remove -n latency_downstream db-proxy
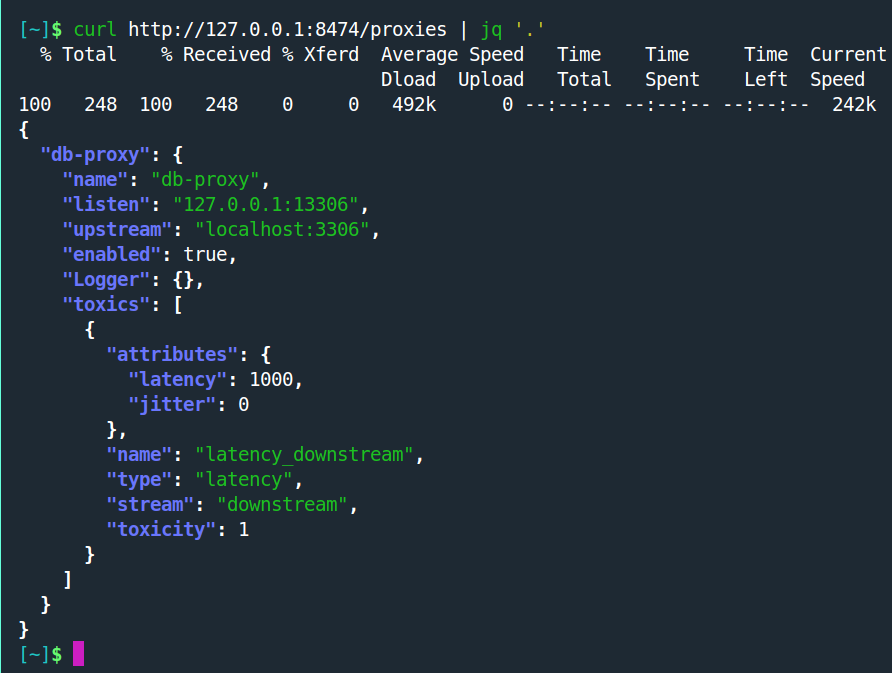
Another feature that Toxiproxy provides is that you can communicate with the running server with a set of REST calls as shown below.

Testing With Testcontainers
Toxiproxy also provides Testcontainer support and we will use it to write a simple integration test.
@Container
    private static GenericContainer mySQLContainer = new MySQLContainer(DockerImageName.parse("mysql/mysql-server:5.7").asCompatibleSubstituteFor("mysql"))
            .withDatabaseName("database")
            .withUsername("user1")
            .withPassword("password")
            .withNetwork(network);

    @Container
    public static ToxiproxyContainer toxiProxy = new ToxiproxyContainer()
            .withNetwork(network);

    @DynamicPropertySource
    static void properties(DynamicPropertyRegistry registry) {
        registry.add("spring.datasource.url", () -> createDBProxy());
    }

    private static String createDBProxy() {
        dbProxy = toxiProxy.getProxy(mySQLContainer, 3306);
        return "jdbc:mysql://" + dbProxy.getContainerIpAddress() + ":" + dbProxy.getProxyPort() + "/database";
    }
Here we set up the Toxiproxy container to create a proxy between the application and the MySQL container.
Next, let's write a test that will introduce a timeout and then catch the exception that is thrown.
 @Test
    @Transactional(propagation = Propagation.NOT_SUPPORTED)
    void checkTimeoutConditionWithDatabase() throws IOException {

        assertThat(postRepository.findAll())
                .isEmpty();

        dbProxy.toxics()
                .timeout("timeout", ToxicDirection.DOWNSTREAM, 1000);

        assertThatThrownBy(() -> postRepository.findAll())
                .isInstanceOf(Exception.class);

    }
Conclusion
Today we saw how we can introduce some network issues between systems that communicate over the network. We can use this mechanism to look into how your system would handle such network-related problems.
You can find the code on my GitHub repo here.
I keep exploring and learning new things. If you want to know the latest trends and improve your software development skills, then subscribe to my newsletter below and also follow me on Twitter.
Enjoy!!