
- Published on
3 Ways to Create Spring Boot Docker Images Without Docker File

- Authors
- Name
- Amrut Prabhu
- @amrutprabhu42

In this article, we would be looking into some of the ways to create docker images for a Spring Boot Application
Introduction
As technology is growing, things have changed how applications that serve requests from end-user are deployed. Traditionally you would have a machine to deploy the application and decide on the configuration of the machine to keep the application running.
The introduction of containers i.e packaging the whole software stack into a single entity and shipping it, solved one of the biggest problems in the developer world. “It works on my machine” :)
So today we would be looking at three mechanisms to build your docker images for a Spring Boot Application.
- Spring Boot build plugin
- Fabric8 Maven Plugin
- JIB maven plugin
Creating an Application
Let’s go to https://start.spring.io and create an application with only the spring-web dependency.
Let's add a simple controller to accept some requests.
@RestController
@SpringBootApplication
public class ServiceDockerImageBuildApplication {

   public static void main(String[] args) {
      SpringApplication.run(ServiceDockerImageBuildApplication.class, args);
   }

   @GetMapping("/")
   public ResponseEntity get(){
      return ResponseEntity.ok("All Ok");
   }
}
When we run this and open “http://localhost:8080", we get a response “All Ok”
With this let’s build our docker image using the build plugin that is available to us out of the box.
Building Docker Images using Spring Boot Build Plugin
Spring Boot’s build plugin provides a way to create docker images using the concept of BuildPacks. Build Packs provides a way to define how your application will be built. It detects the type of application and builds it so that you can run on a particular platform or independent of it.
Now, Spring Boot’s build plugin uses a BuildPack builder image which will automatically detect that it's a spring boot application and builds the relevant image for you.
The only thing you would have to do is call image-build goal on your spring boot application using maven.
mvn spring-boot:build-image
This will pull the base builder image from BuildPacks to detect the type of application and select build packs for the application. It then uses the selected build packs and builds your final image.
Here is a log that shows the build packs required to build your application.
===> DETECTING
[INFO]     [creator]     6 of 24 buildpacks participating
[INFO]     [creator]     paketo-buildpacks/ca-certificates   3.2.4
[INFO]     [creator]     paketo-buildpacks/bellsoft-liberica 9.3.7
[INFO]     [creator]     paketo-buildpacks/syft              1.12.0
[INFO]     [creator]     paketo-buildpacks/executable-jar    6.2.4
[INFO]     [creator]     paketo-buildpacks/dist-zip          5.2.4
[INFO]     [creator]     paketo-buildpacks/spring-boot       5.12.0
...
...
[INFO] Successfully built image 'docker.io/library/service-docker-image-build:0.0.1-SNAPSHOT'
You can always specify the name of your final image using a parameter as shown below
mvn spring-boot:build-image \
-Dspring-boot.build-image.imageName=my-spring-boot-image
Or you can specify it in the configuration as shown below
<plugin>
   <groupId>org.springframework.boot</groupId>
   <artifactId>spring-boot-maven-plugin</artifactId>
   <configuration>
      <imageName>my-spring-boot-image</imageName>
   </configuration>
</plugin>
Now, I see there are a few levels of customization you can do here. If you want to really customize the building process of your image, you would have to create your own builder image to define your build process.
Let’s Look at yet another way of building Images.
Building Docker images using Fabric8 Maven Plugin
Fabric8 is one popular API provider for the world of containerization. They have client APIs to communicate with the Kubernetes cluster and today we would be using their maven plugin to build docker images.
<plugin>
<groupId>io.fabric8</groupId>
<artifactId>docker-maven-plugin</artifactId>
<version>0.40.1</version>
<configuration>
   <images>
      <image>
         <name>${project.name}:${project.version}</name>
         <build>
            <from>openjdk:17</from>
            <assembly>
               <name>build</name>
               <descriptorRef>artifact</descriptorRef>
            </assembly>
            <ports>
               <port>8080</port>
            </ports>
            <cmd>java -jar build/${project.name}-${project.version}.jar</cmd>
         </build>
      </image>
   </images>
</configuration>
   <executions>
   <execution>
      <id>build-image</id>
      <phase>verify</phase>
      <goals>
         <goal>build</goal>
      </goals>
   </execution>
   </executions>
</plugin>
The configuration section is pretty straightforward. Let's look at some of the important ones in the <build> section.
Here we specify the base image, using the <from> tag and then specify how the image is assembled in the <assembly> section.
In the assembly section, we specify <descriptorRef> with a value artifact to indicate that we want to only copy the built artifact and the <name> tag specifies where it will be copied to in the target image. There are various options for the desciptorRef, like if you want to copy dependencies along with artifact or only dependencies, etc, which you can find it here. Since we build a single fat jar, we can just copy the artifact.
Finally, we specify <cmd> to run the jar file that was copied.
After running the maven build command, the image is built.
I inspected the image layers, and I see the artifact being copied as the last layer as seen below.

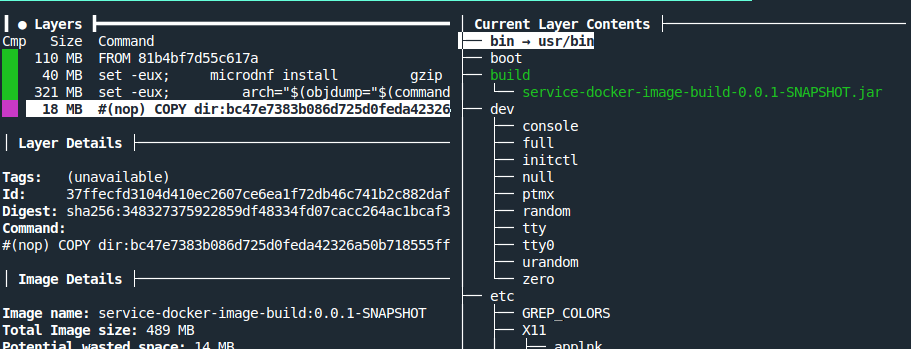
You can always create a layered docker image, by specifying in the assembly tag the layers you want to create and what needs to be copied in those layers. You can find more customization options at this link.
We can now simply run the docker file using docker run -p 8080:8080 service-docker-image-build:0.0.1-SNAPSHOT
Building Docker images using Google’s JIB Plugin
Let's look at the JIB plugin from Google. It's one of the tools provided and maintained by Google and provides quite some detailed level of customizations.
<build>
   <plugins>
      <plugin>
         <groupId>com.google.cloud.tools</groupId>
         <artifactId>jib-maven-plugin</artifactId>
         <version>3.2.1</version>
         <configuration>
            <from>
               <image>openjdk:17</image>
            </from>
            <to>
               <image>jib-build-${project.name}:${project.version}</image>
            </to>
         </configuration>
         <executions>
            <execution>
               <phase>verify</phase>
               <goals>
                  <goal>dockerBuild</goal>
               </goals>
            </execution>
         </executions>
      </plugin>
   </plugins>
</build>
Here, we specify the base image we want in the <from> tag and the final image name we wish to have in the <to> tag.
Now, I have used the dockerBuild goal in the <execution> section, so that the docker image is built to my local docker daemon. If you use the build goal, the JIB plugin will build the docker image and also push it to the respective repository. It supports all the major repositories like docker.io, AWS ECR, Google GCR, Azure ACR, etc. For this, you can set the authentication mechanism to push the image. You can read about this here.
Let’s look at the layers of the image that are created.

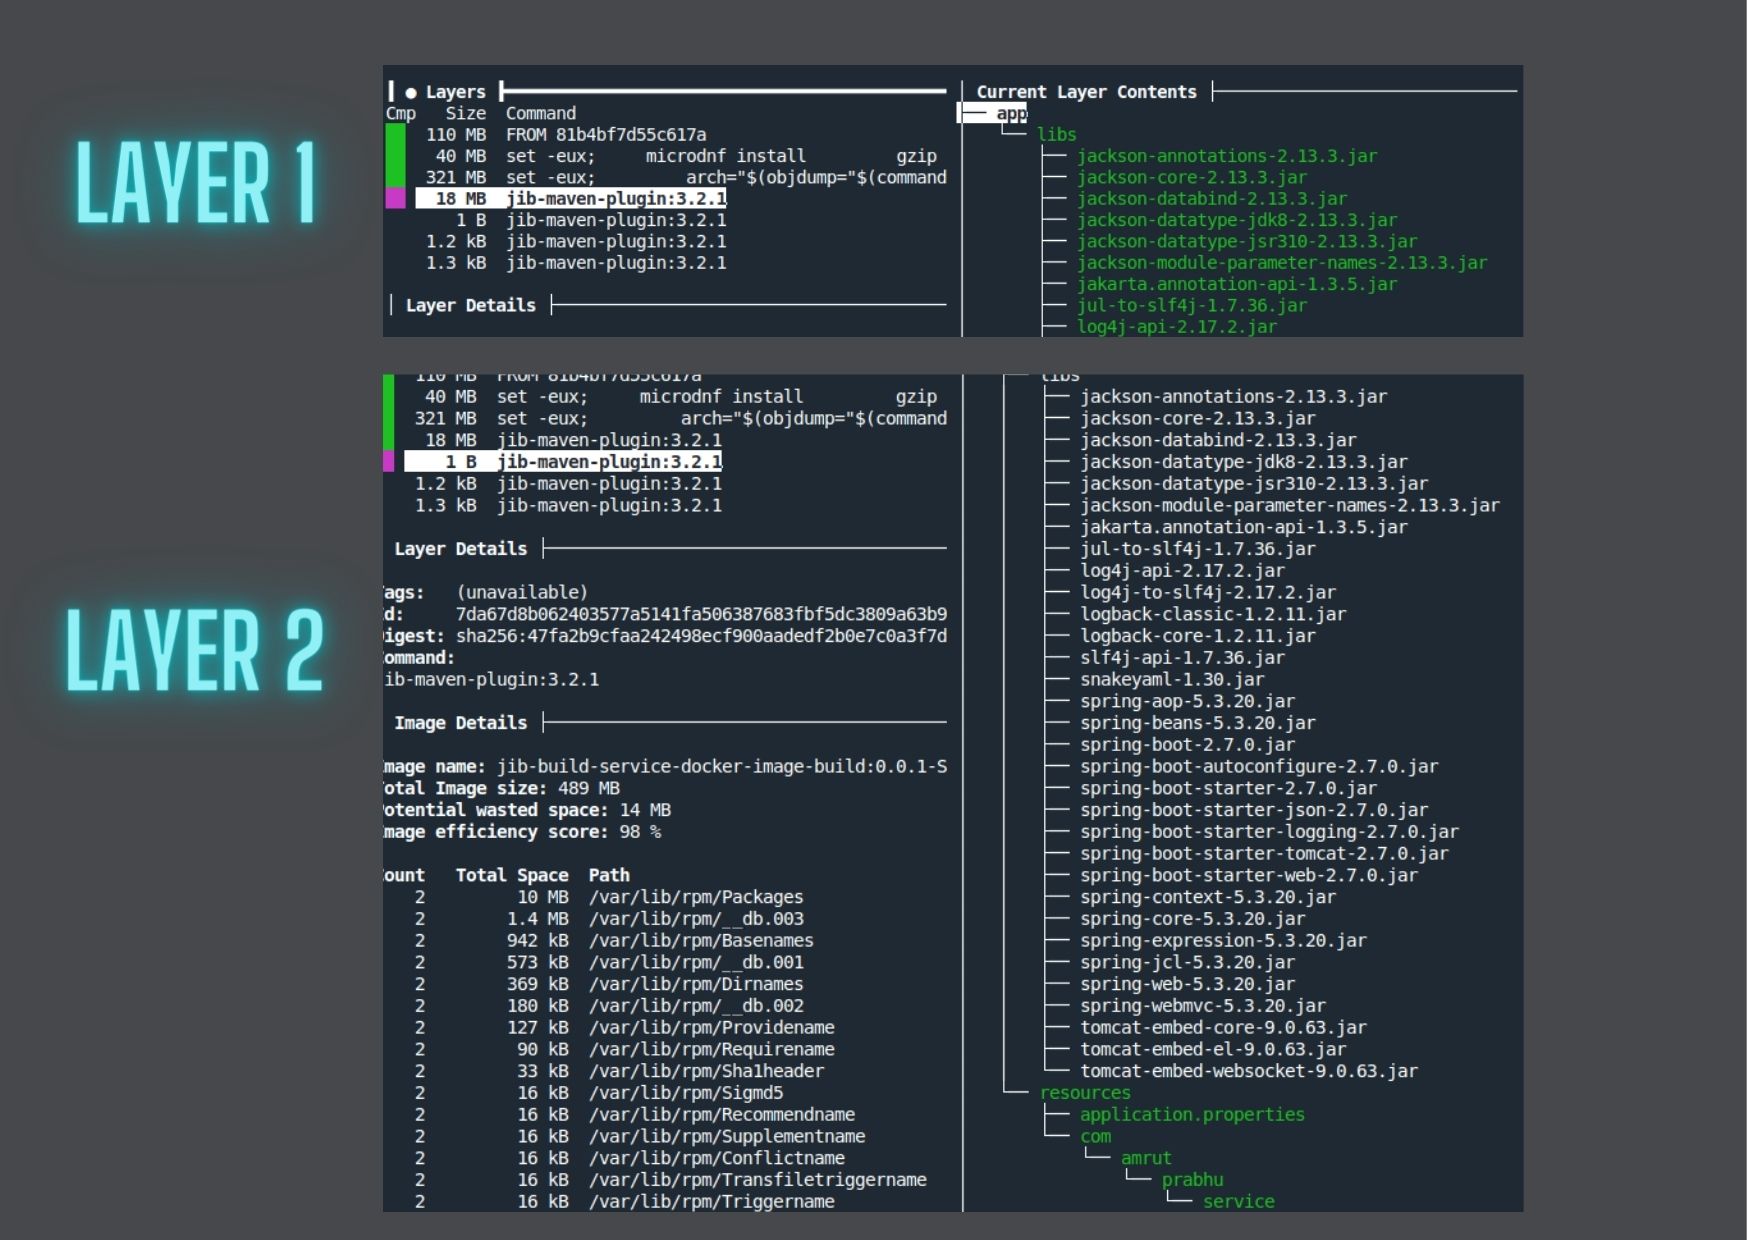

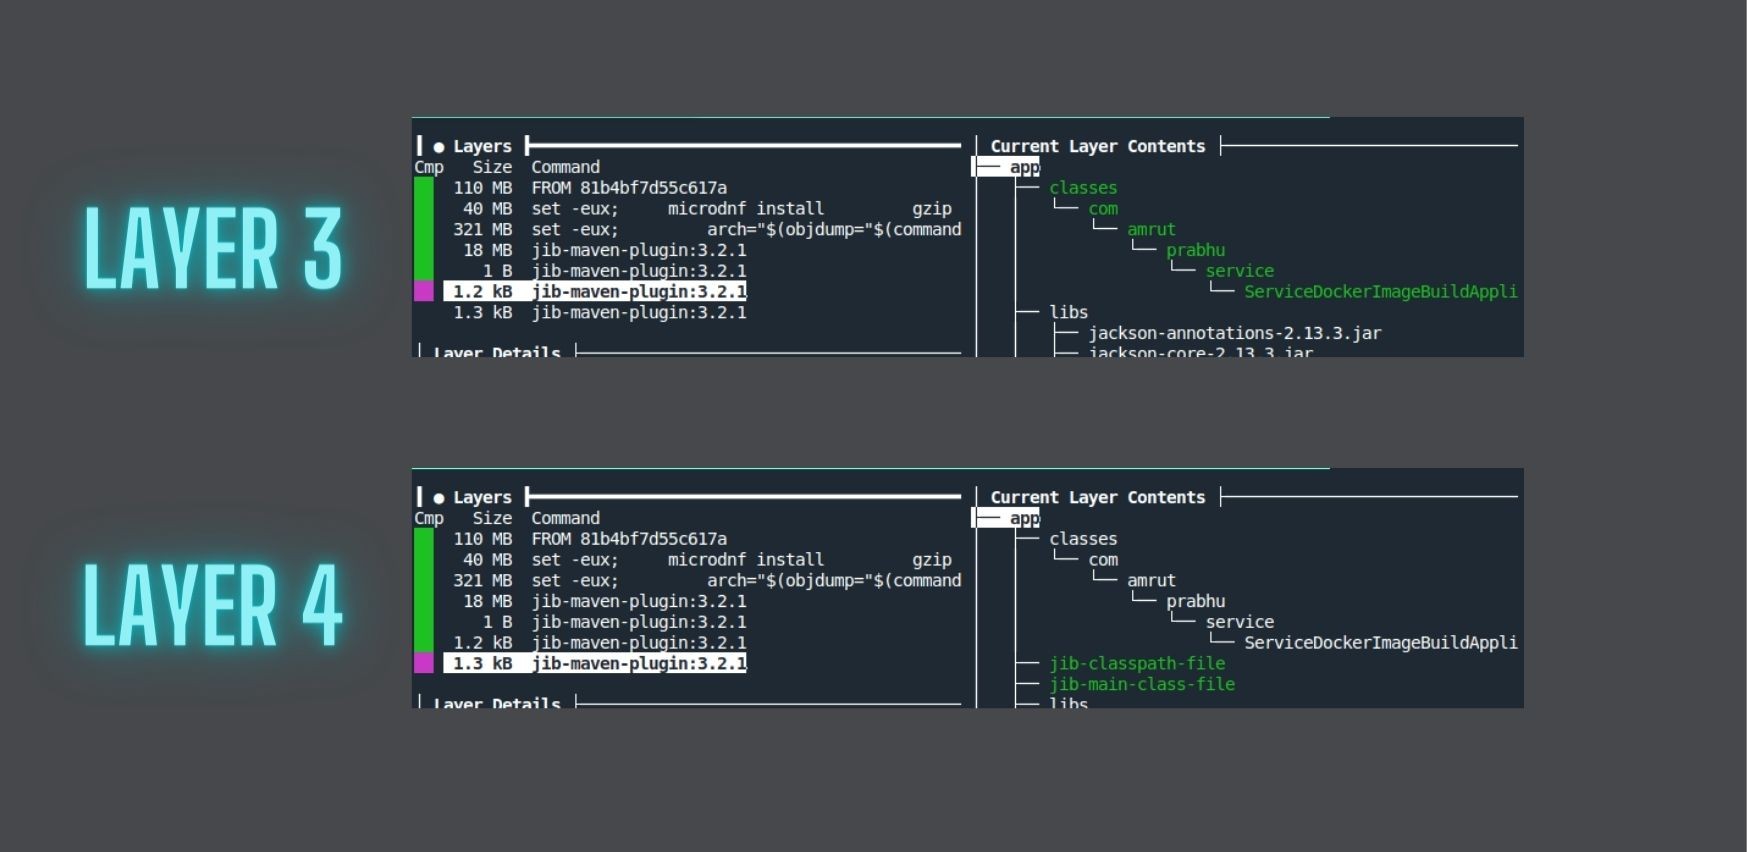
If you see in the images above, the layers are created as follows
- Layer 1: Contains all the dependencies.
- Layer 2: Contains the application resources.
- Layer 3: Contains the application classes.
- Layer 4: Contains the
jib-classpath-filecontaining classpath information and thejib-main-class-filecontaining the name of the fully qualified main class that will be executed.
You can always customize how the image is built by finding the options in this link
Conclusion
Today we saw how we can build docker images, without the need to write docker files manually. We just need to include a plugin in your maven build profile, build the image and push it to its repository.
The one that I personally like is the jib plugin because of its level of customization and docker image layers that are available out of the box.
You can find the complete code on my GitHub repo here.
I keep exploring and learning new things. If you want to know the latest trends and improve your software development skills, then subscribe to my newsletter below and also follow me on Twitter.
Enjoy!!