
- Published on
How to Send Push Notification With Spring Boot using Websockets and STOMP

- Authors
- Name
- Amrut Prabhu
- @amrutprabhu42

In this article, we will explore how we can send push notifications with a Spring Boot application using Websockets and STOMP protocol. We will first look into how we can send a notification to all the users and then also send notifications to specific users.
Introduction
Push notification is a form of real-time messaging, wherein a website could inform a user about some real-time event. Its usually implemented with WebSockets, which provide bi-directional communication between the client and the server. Hence this allows for handling real-time messaging. There are alternatives to this, like long polling, which has its own advantages and disadvantages.
Today, we would look into using WebSockets to implement push notifications and for this, we would use the STOMP protocol over WebSockets to communicate between client and server.
What is STOMP?
STOMP stands for Simple Text Oriented Messaging Protocol. As WebSockets is a low-level protocol, which uses frames to communicate data, STOMP is a higher-level protocol that defines how certain frame types can interpret the data. These include frame types like CONNECT, SEND, ACK, etc. This way it's much easier to work with WebSockets to send, receive and interpret data.
With this, Let's create our server application.
Creating an Application
Let’s go to https://start.spring.io and create a spring boot application with the following dependency
- Spring Boot Starter Websockets
Now, we would be using an embedded message broker. It will be an in-memory broker providing us with WebSocket capabilities. Let’s add certain destinations to the broker. These destinations refer to the paths on which messages will be sent.
@Configuration
@EnableWebSocketMessageBroker
public class WebSocketConfig implements WebSocketMessageBrokerConfigurer {

    @Override
    public void configureMessageBroker(MessageBrokerRegistry config) {
        config.enableSimpleBroker("/all","/specific");
        config.setApplicationDestinationPrefixes("/app");
    }

    @Override
    public void registerStompEndpoints(StompEndpointRegistry registry) {
         registry.addEndpoint("/ws");
         registry.addEndpoint("/ws").withSockJS();
    }
}
In the first part, we enable a broker with two destinations /all and /specific. The /all destination will be used to send notifications to all users and the /specific destination will be used to send to specific users.
Next, we set the application destination i.e /app , which will provide us to send messages to the application.
In the second part, we register STOMP endpoints. One with SockJS enabled and the other just for WebSocket. This is done because not all browsers support WebSockets and when it's not available we can fall back to using SockJS.
Sending Push Notifications to All
Let's look at the first use case, where we want to send a push notification to all users.
For this, we will first implement a controller which will relay information from one client to all the clients.
@org.springframework.stereotype.Controller
public class Controller {

    @Autowired
    SimpMessagingTemplate simpMessagingTemplate;

    @MessageMapping("/application")
    @SendTo("/all/messages")
    public Message send(final Message message) throws Exception {
        return message;
    }
Here we are accepting messages on the /application endpoint. This is actually a sub-destination on the application destination we defined earlier which was /app . This means the client has to send the message to the destination /app/application to reach this handler.
Next, we forward the incoming message to /all/messages. Now all clients subscribing to the messages on this destination will get the messages intended to be sent to all the clients.
Let’s look at the client code on the HTML page
<script type="text/javascript">
        var stompClient = null;

        var socket = new SockJS('/ws');
        stompClient = Stomp.over(socket);
        stompClient.connect({}, function(frame) {
            console.log(frame);
            stompClient.subscribe('/all/messages', function(result) {
                show(JSON.parse(result.body));
            });
        });
Here using a STOMP client, we establish a connection over the WebSocket and then subscribe to the messages on /all/messages
Now to send the message to the application, we have the following Javascript function which sends the message to /app/application
function sendMessage() {
  var text = document.getElementById('text').value
  stompClient.send('/app/application', {}, JSON.stringify({ from: from, text: text }))
}
It simply takes the text value from the text field and sends it to the broker’s application destination.
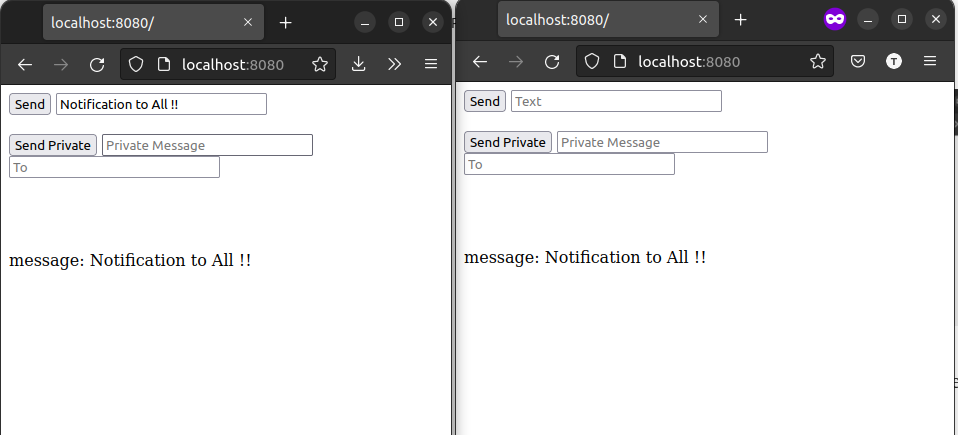
This is all connected using a simple form as shown below.


To test this, let’s send a push notification “Notification to all” to all the connected clients.

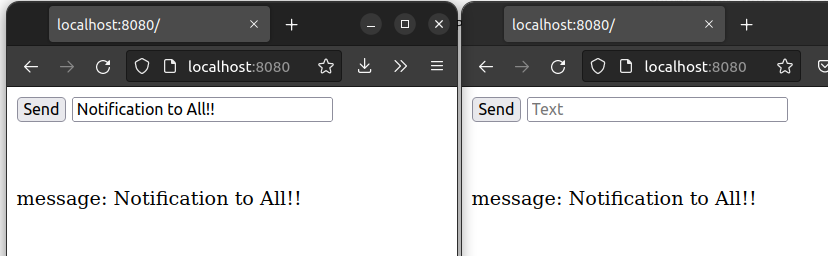
Here we have two clients connected and both clients receive the notification instantly.
Now, here we are just displaying what we receive from the WebSocket, but you can customize this as a notification popup or as a notification tag using CSS and Javascript.
This was how we can send notifications to all the users. What about sending notifications to a specific user?
Let’s look at that.
Sending Push Notifications to Specific Users
To send notifications to a specific user, we would need the user id of the recipient. This means the recipient user needs to be logged in and provide a valid session that identifies the user against its user id.
For this, we will integrate Spring Security. So let's add the following dependency.
- Spring Boot Starter Security.
With spring security dependency added, we need to define a security configuration to allow connections using WebSockets.
@Bean
public SecurityFilterChain filterChain(HttpSecurity http) throws Exception {
    http
            .authorizeHttpRequests()
                .mvcMatchers("/","/ws/**")
                .permitAll()
            .and()
            .authorizeHttpRequests()
                .anyRequest().authenticated()
            .and()
            .formLogin()
            .and()
            .logout( logout -> logout.logoutSuccessUrl("/"));
    return http.build();
}

@Bean
public InMemoryUserDetailsManager userDetailsService() {
    UserDetails user = User.withDefaultPasswordEncoder()
            .username("test")
            .password("test")
            .roles("USER")
            .build();

    return new InMemoryUserDetailsManager(user);
}
Here, we are allowing all connections to /ws path to allow WebSocket communication without any authentication and also defining a static user called test.
Remember we created /specfic destination on the message broker setting above? We will use that now to send specific messages.
First, let’s add a handler in our controller to take messages and send them to specific users who will be identified using their usernames.
@org.springframework.stereotype.Controller
public class Controller {

    @Autowired
    SimpMessagingTemplate simpMessagingTemplate;

    @MessageMapping("/application")
    @SendTo("/all/messages")
    public Message send(final Message message) throws Exception {
        return message;
    }

    @MessageMapping("/private")
    public void sendToSpecificUser(@Payload Message message) {
        simpMessagingTemplate.convertAndSendToUser(message.getTo(), "/specific", message);
    }
}
Now in the sendToSpecificUser method, we accept messages sent using /app/private. The message contains the text to be sent to the recipient and the user id of the recipient.
Now here comes the magic.
What the messaging template does is, it sends the message to a destination which starts with /user , then appends it with the destination we provided in the function, i.e /specific and then attaches the user session id of the user we specified in the convertAndSendToUser function call.
So basically, the convertAndSendToUser send the message to the destination /user/specific-<user-session-id> . This destination is created when a user logins and subscribes to the destination /user/specific.
When the user is logged in and subscribes to the destination /user/specific , it sends the valid logged-in session id along with it. Spring then automatically handles that subscribing to /user/specific will automatically subscribe to the specific destination for the logged-in user. i.e /user/specific-<user-session-id>
This also means you can send notifications only when the user is logged in.
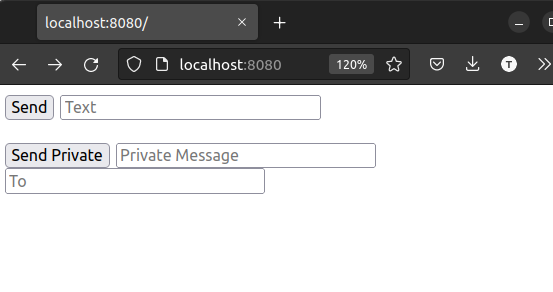
Now, let's add a new text block and subscribe to the user-specific destination.
socket = new SockJS('/ws')
privateStompClient = Stomp.over(socket)
privateStompClient.connect({}, function (frame) {
  console.log(frame)
  privateStompClient.subscribe('/user/specific', function (result) {
    console.log(result.body)
    show(JSON.parse(result.body))
  })
  file
})

Let’s open two clients and log in to the second one with the test user. You can trigger the login with /login endpoint.

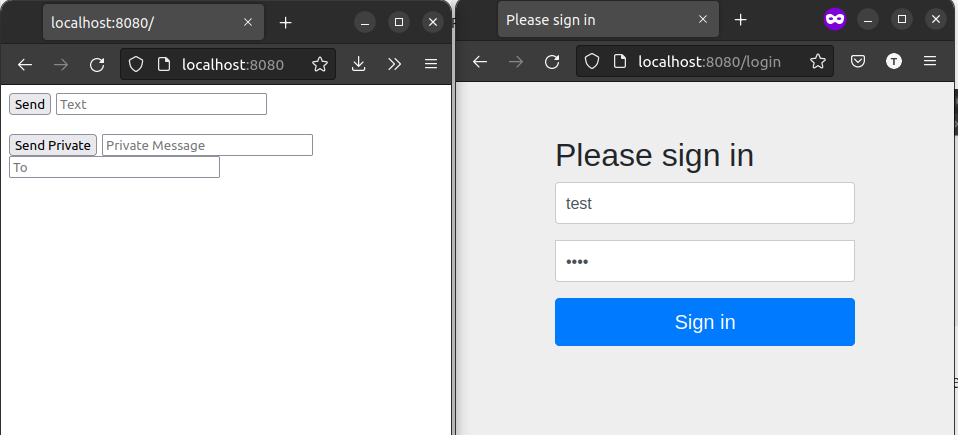
In the image above, we are logging in to the second client as a “test” user.
Once you have logged in, let's first send the message to all clients.
So, here even the logged-in user gets the notification that was sent to all the clients.
Now, let’s send a private notification to only the “test” user.

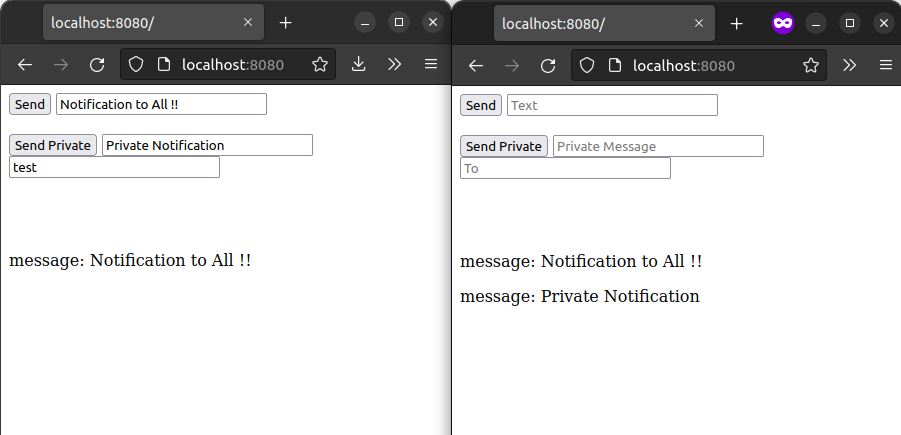
In the above image, we are providing a message to the specific user and also specifying the user id of the specific user .i.e “test” and the notification is only delivered to the logged-in user.
Here is a short demonstration of how it all works.
Conclusion
We just saw how we can send push notifications using a spring boot application with WebSockets and STOMP protocol. Instead of using the embedded broker, you can connect an external ActiveMQ instance to the application as it supports STOMP protocol. We can then relay the messages to the external ActiveMQ instance via the application.
You can find the entire code on my GitHub repo here.
I keep exploring and learning new things. If you want to know the latest trends and improve your software development skills, then subscribe to my newsletter below and also follow me on Twitter.
Enjoy!!