
- Published on
How to Fetch Database Secrets From AWS Secrets Manager in a Spring Boot Application

- Authors
- Name
- Amrut Prabhu
- @amrutprabhu42

In this article, we will look into how we can fetch database secrets from the AWS Secrets Manager in a Spring Boot application to communicate with a database. Once we do that, we will then start a LocalStack instance to mimic the real AWS Secrets Manager service and make our application load secrets offline without communicating with the real AWS Secrets Manager service. Lastly, we will write an integration test using Testcontainers.
Creating a Spring Boot Application
Let’s go to https://start.spring.io and create an application with the following dependencies.
- Spring Boot Starter Web (only required for REST endpoints)
- Spring Boot Starter Actuator (only to visualize the loaded properties)
- Spring Boot Starter Data JPA (for database communication)
Next, we will use the Spring Cloud AWS Secrets Manager dependency to fetch our secrets. Currently, it's not yet released for general use but we will use the M2 version as of now.
For this, we will use the Spring Cloud AWS dependency management to take care of our dependency versions.
<dependencyManagement>
   <dependencies>
      <dependency>
         <groupId>io.awspring.cloud</groupId>
         <artifactId>spring-cloud-aws-dependencies</artifactId>
         <version>3.0.0-M2</version>
         <type>pom</type>
         <scope>import</scope>
      </dependency>
   </dependencies>
</dependencyManagement>
Next, we will add the following dependency
<dependency>
   <groupId>io.awspring.cloud</groupId>
   <artifactId>spring-cloud-aws-starter-secrets-manager</artifactId>
</dependency>
With this, let's create some secrets on the AWS Secrets Manager
Creating Secrets on AWS Secrets Manager
Let's create a secret using the AWS CLI configured in the system. In case you have not installed it, you can install it from here or you can also create the secret using the AWS console UI.
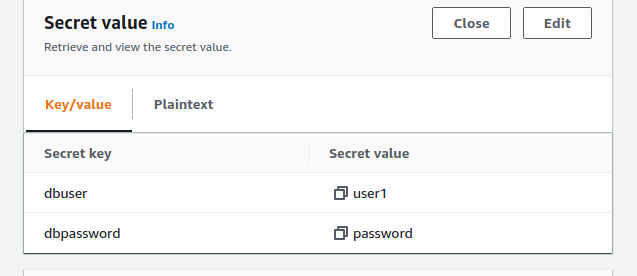
aws secretsmanager create-secret --name /secret/db-credential --secret-string '{"dbuser": "user1", "dbpassword": "password"}'
With this, we will have a secret created with two key-value pairs as shown below.

Creating JPA Model Class
Let's create a simple domain model class and a JPA repository as follows.
@Table(name = "model")
@Entity
public class Model {

    @Id
    private Integer id;

    @Column(name = "name")
    private String name;

    //ommited getters and setters from here
}
public interface ModelRepository extends JpaRepository<Model, String> {
}
Next, we will create simple REST endpoints to fetch and store data.
@RestController("/")
public class WebController {
    @Autowired
    private ModelRepository modelRepository;

    @GetMapping
    public ResponseEntity get() {
        return ResponseEntity.ok(modelRepository.findAll());
    }

    @PostMapping
    public ResponseEntity save(@RequestBody Model model) {
        return ResponseEntity.ok(modelRepository.save(model));
    }
}
AWS Secrets Manager Configuration
In the application.yaml we will add the following properties.
# actuator configuration
management:
  endpoints:
    web:
      exposure:
        include:
          - env

spring:
  datasource:
    url: jdbc:mysql://localhost:3306/database
    username: ${dbuser}
    password: ${dbpassword}
  jpa:
    hibernate:
      ddl-auto: create
  #  AWS configuration
  cloud:
    aws:
      secretsmanager:
        region: eu-central-1

    credentials:
      profile:
        name: personal

  config:
    import:
      - aws-secretsmanager:/secret/db-credential
      - optional:aws-secretsmanager:/secrets/optional-secret
Firstly, we have configured management endpoints to show the application’s environment properties. We will use this endpoint to see what secret values got loaded.
Now, we have two placeholder properties called dbuser and dbpassword which match exactly the keys in the secret we created on Secrets Manager.
Next, to communicate with AWS, we are going to be using the AWS profile credentials mechanism.
I have my AWS CLI configured with the AWS credentials under the profile called “personal” and we will be using this profile to communicate with AWS. There are quite a few ways of communicating with AWS and you can find them here.
Finally, we specify the secrets we want to fetch from the Secrets Manager under the spring.config.import property. To indicate the secrets are needed to be fetched from AWS Secrets Manager, we have to specify aws-secretsmanager before the list of secrets to be fetched.
By default, the application needs access to the secrets on startup or the startup would fail. You can always specify an optional label to allow the application to start without failing if the secret does not exist, just as we did for the secret/secret/optional-secret.
With this, let's start the application.
The application starts up pulling the secrets from Secrets Manager and the values of the dbuser and dbpassword keys are used to communicate with the database.
Now on accessing the actuator endpoint http://localhost:8080/actuator/env , we see the properties that are loaded from Secrets Manager.
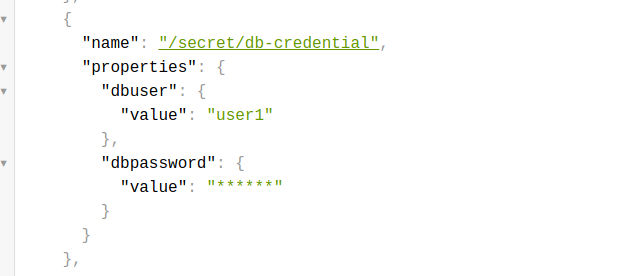
Now, let’s make some REST requests to store and fetch data from our database.

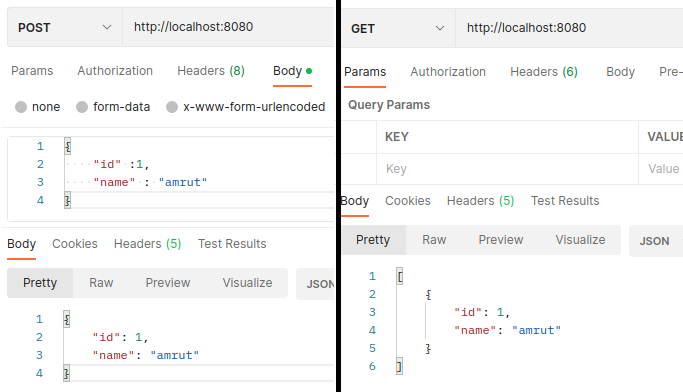
With this, we were able to pull the secrets from the AWS Secrets Manager, view the loaded secrets using actuator endpoints, and communicate with the database to store and fetch data.
Now, let's see how we can do the same with LocalStack.
Loading Secrets from LocalStack
To load secrets from LocalStack, we will use the docker version of LocalStack and run it using a docker-compose file.
version: '3.8'

services:
  localstack:
    image: localstack/localstack
    ports:
      - '4566:4566' # LocalStack endpoint
    environment:
      - DOCKER_HOST=unix:///var/run/docker.sock
      - DEFAULT_REGION=eu-central-1
    volumes:
      - ./localstack-script:/docker-entrypoint-initaws.d
      - /var/run/docker.sock:/var/run/docker.sock
Here we are mounting a local volume that contains an init script for creating the secrets in LocalStack. This init script makes use of the awslocal command which is a wrapper around the AWS CLI inside LocalStack. We then give it the same command options that we used before to create the secret on AWS Secrets Manager but this time we use the command awslocal provided by LocalStack.
awslocal secretsmanager create-secret --name /secret/db-credential --secret-string '{"dbuser": "user1", "dbpassword": "password"}'
Next, we will have to configure the LocalStack URL in our properties file as shown below.
Spring:
  cloud:
    aws:
      secretsmanager:
        region: eu-central-1
        endpoint: http://localhost:4566
      credentials:
        access-key: none
        secret-key: none
LocalStack does not require any credentials to communicate with it. But to work with the AWS client, the client needs a secret and access key values. Hence we provide any random value for the secret and access key.
With this, you can now communicate with LocalStack and fetch secrets from LocalStack.
Integration Test with LocalStack
Every application that you develop needs to have some tests, so you can evolve your application without breaking it.
So let’s write an Integration test that will start the application by pulling secrets from Localstack using Testcontainers and then store and retrieve data from our database. We will also start the database using Testcontainers.
Let’s look at the test setup we need.
@SpringBootTest
@AutoConfigureMockMvc
class ApplicationIT {

    @Autowired
    MockMvc mockMvc;

    @Container
    private static LocalStackContainer localStackContainer = new LocalStackContainer(DockerImageName.parse("localstack/localstack"))
           .withCopyFileToContainer(MountableFile.forClasspathResource("script.sh"),
                    "/docker-entrypoint-initaws.d/")
            .withServices(LocalStackContainer.Service.SECRETSMANAGER);

    @Container
    private static MySQLContainer database = new MySQLContainer(DockerImageName.parse("mysql/mysql-server:5.7").asCompatibleSubstituteFor("mysql"))
            .withDatabaseName("database")
            .withUsername("user1")
            .withPassword("password");
Here we start the two Testcontainers, LocalStackContainer and MySQLcontainer.
The LocalStackContainer has an instruction to copy an init script to the docker-entrypoint-initaws.d folder which will create the secret in LocalStack. It's the same script we had seen above while starting the docker-compose file.
Next, we have the MySQLContainer with a database name, a user, and a password configured for the database.
Now let’s initialize the properties with values from Testcontainers.
@BeforeAll
static void beforeAll() throws IOException, InterruptedException {
    System.setProperty("spring.cloud.aws.secretsmanager.endpoint", localStackContainer.getEndpointOverride(LocalStackContainer.Service.SECRETSMANAGER).toString());
    System.setProperty("spring.cloud.aws.secretsmanager.region", localStackContainer.getRegion());
    System.setProperty("spring.cloud.aws.credentials.access-key", "none");
    System.setProperty("spring.cloud.aws.credentials.secret-key", "none");
}

@DynamicPropertySource
static void properties(DynamicPropertyRegistry registry) {
    registry.add("spring.datasource.url", () -> database.getJdbcUrl());
}
Here, we use the @DynamicPropertySource to bind the properties for the database URL and we use @BeforeAll , to set the properties for the LocalStackContainer.
So why are using @BeforeAll and not @DynamicPropertySource to set the property values for LocalStack?
This is because @DynamicPropertySource does not work with Spring config import. If you set the AWS credentials properties using @DynamicPropertySource , they get loaded after the application is initialized and the application does not communicate with LocalStack. You can read about this issue here.
So the best option, for now, is to set the properties using System.setProperty .
Finally, we will run the test and check if the application starts up, fetches secret values, and then make REST calls to save and fetch data.
@Test
void testApplicationLoadsAndServesRequests() throws Exception {
    //Given
    Model model = new Model();
    model.setId(1);
    model.setName("name");

    //when
    mockMvc.perform(MockMvcRequestBuilders.post("/")
                    .contentType(MediaType.APPLICATIONJSON)
                    .content(new ObjectMapper().writeValueAsString(model)))
    //then
            .andExpect(MockMvcResultMatchers.status().isOk())
            .andExpect(jsonPath("$.id", Matchers.is(1)))
            .andExpect(jsonPath("$.name", Matchers.is("name")));

    //when
    mockMvc.perform(MockMvcRequestBuilders.get("/"))
    //then
            .andExpect(MockMvcResultMatchers.status().isOk())
            .andExpect(jsonPath("$.[0].id", Matchers.is(1)))
            .andExpect(jsonPath("$.[0].name", Matchers.is("name")));


}
Now, this is just one of the ways that you can test your code.
If you want to learn how you can write good and reliable tests and want to master your skills in writing tests, I would highly recommend the course “Testing Spring Boot Application Masterclass” by Philip Riecks.

This course provides you with a comprehensive guide on how you can start and grow your knowledge on writing effective tests for your Spring Boot application.
Conclusion
We just saw how we can fetch database credentials from AWS Secrets manager using Spring Cloud AWS Secrets Manager. We then looked at how we can work with LocalStack to fetch secrets and also wrote an integration test using Testcontainers.
The entire code is uploaded to my GitHub repo here.
I keep exploring and learning new things. If you want to know the latest trends and improve your software development skills, then subscribe to my newsletter below and also follow me on Twitter.
Enjoy!!