
- Published on
Part 2: How to Create a Spring Boot Kubernetes Controller

- Authors
- Name
- Amrut Prabhu
- @amrutprabhu42

In my earlier article here, we saw how we can create a Kubernetes Custom Resource Definition (CRD) and deploy it to a Kubernetes cluster. In this article, we will look at creating a Kubernetes Controller using Spring Boot that will handle requests when a CRD instance is created, updated, or deleted.
Project Setup
Let’s go to https://start.spring.io and create a new project with the following dependencies.
- Spring Starter Web
Next, you need to add the Kubernetes Java client dependency as below
<dependency>
  <groupId>io.kubernetes</groupId>
  <artifactId>client-java-spring-integration</artifactId>
  <version>16.0.0</version>
</dependency>
With this, we are ready with the setup.
Generating Java Model Classes For CRD
In order to work with the Kubernetes CRD, we created in the previous article, we would need to get Java class representations of the CRD.
We can use a utility that will generate the class files from a deployed CRD.
For this, you need to have docker running and then run the following command.
#!/usr/bin/env bash

LOCAL_MANIFEST_FILE=/home/amrut/projects/kubernetes-custom-resource/crd/my-crd.yaml
mkdir -p /tmp/java && cd /tmp/java
docker run \
  --rm \
  -v "$LOCAL_MANIFEST_FILE":"$LOCAL_MANIFEST_FILE" \
  -v /var/run/docker.sock:/var/run/docker.sock \
  -v "$(pwd)":"$(pwd)" \
  -ti \
  --network host \
  ghcr.io/kubernetes-client/java/crd-model-gen:v1.0.6 \
  /generate.sh \
  -u $LOCAL_MANIFEST_FILE \
  -n prabhu.amrut.com \
  -p com.amrut.prabhu \
  -o "$(pwd)"
Let me explain what this command does.
It first creates a temp directory to store the generated classes. It then starts a Kind Kubernetes Cluster using Docker, applies the mounted Kubernetes CRD file to the cluster, and generates the Java class files from the deployed CRD in the temp directory.
Important note: The flag -n should be the reverse order of the group name. In our case its
prabhu.amrut.comsince the group name wascom.amrut.prabhu
You can always read about this in their documentation here.
Understanding the Use Case
Before we start creating the controller, let’s understand the use case we want to achieve.
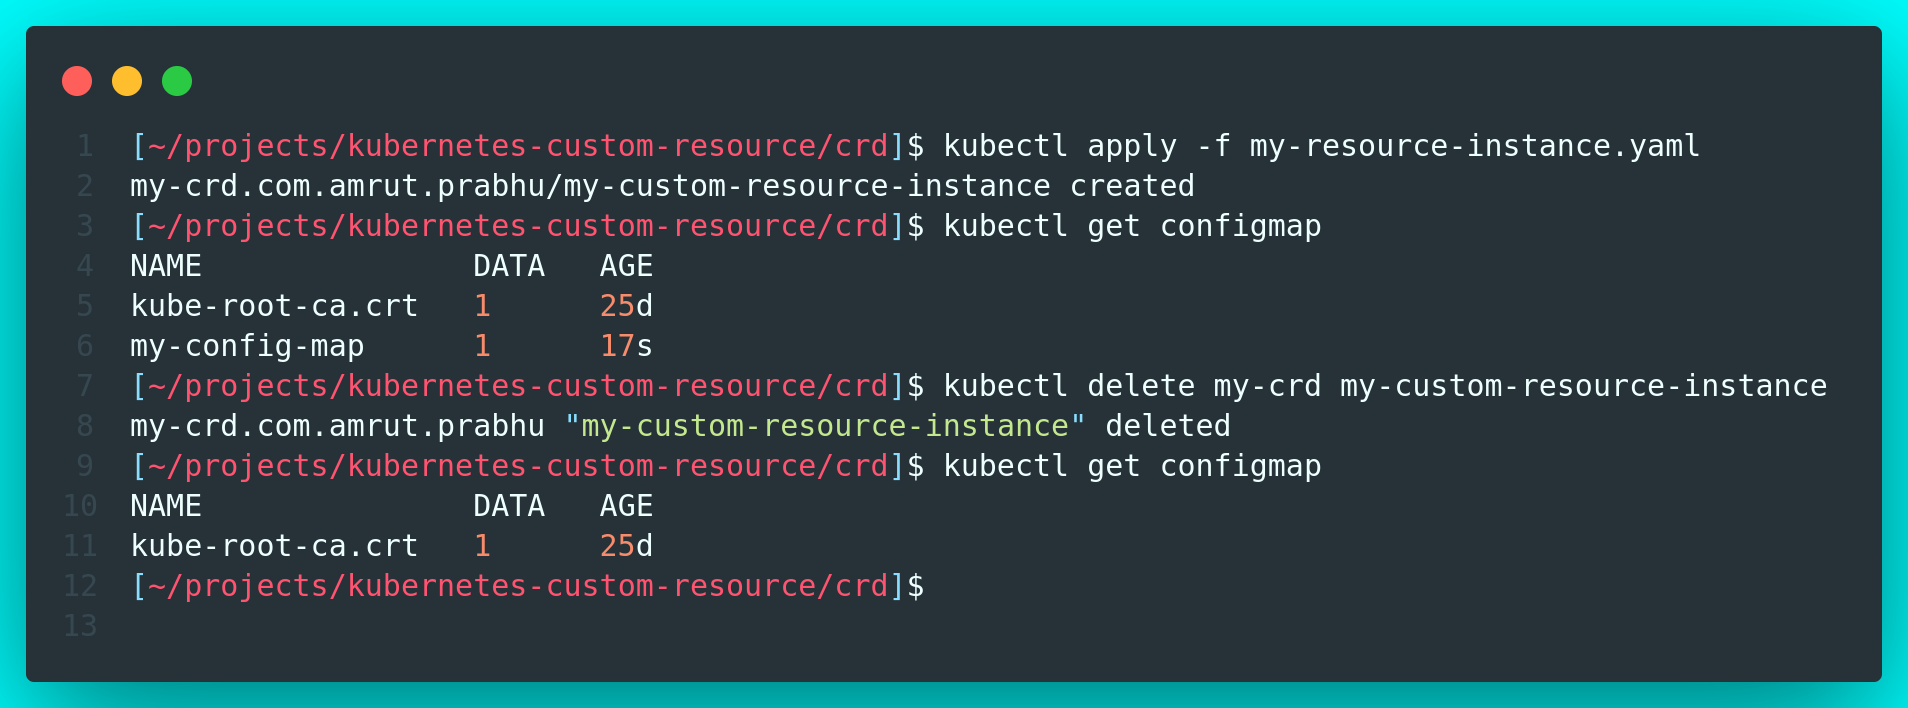
When we create a CRD instance, we want the controller to create a Kubernetes config map. If the CRD instance is updated, the controller updates the config map and similarly, if it is deleted, the config map is deleted.
With this understanding, Let’s create our Kubernetes Controller.
Creating a Kubernetes Controller
Now to create a controller, we need to create a few components.
- A reconciler: This component is used to handle requests when there is a change in the CRD instance. It will be invoked when we create, update or delete a CRD instance so that we can do something with the changes.
- A Shared Index Informer: This is more like a cache, so the controller does not need to continuously poll the Kubernetes cluster (API server) to check if there are any new CRD instances created, updated, or deleted.
- APIClient: It is a client used to connect to the Kubernetes Cluster (API server)
- CRD Model: These are the model classes we generated earlier.
Let’s start with creating the first component which is the shared index informer.
@Bean
SharedIndexInformer<V1MyCrd> sharedIndexInformer(SharedInformerFactory sharedInformerFactory, ApiClient apiClient) {
    GenericKubernetesApi<V1MyCrd, V1MyCrdList> api = new GenericKubernetesApi<>(V1MyCrd.class,
            V1MyCrdList.class,
            "com.amrut.prabhu",
            "v1",
            "my-crds",
            apiClient);
    return sharedInformerFactory.sharedIndexInformerFor(api, V1MyCrd.class, 0);
}
So here, we create an index informer, which will be having a reference of an APIClient to look for any created instances of the CRD.
Understanding the Reconciler Component
Now, to understand what we should do in the reconciler, let’s see this with a small flow chart.

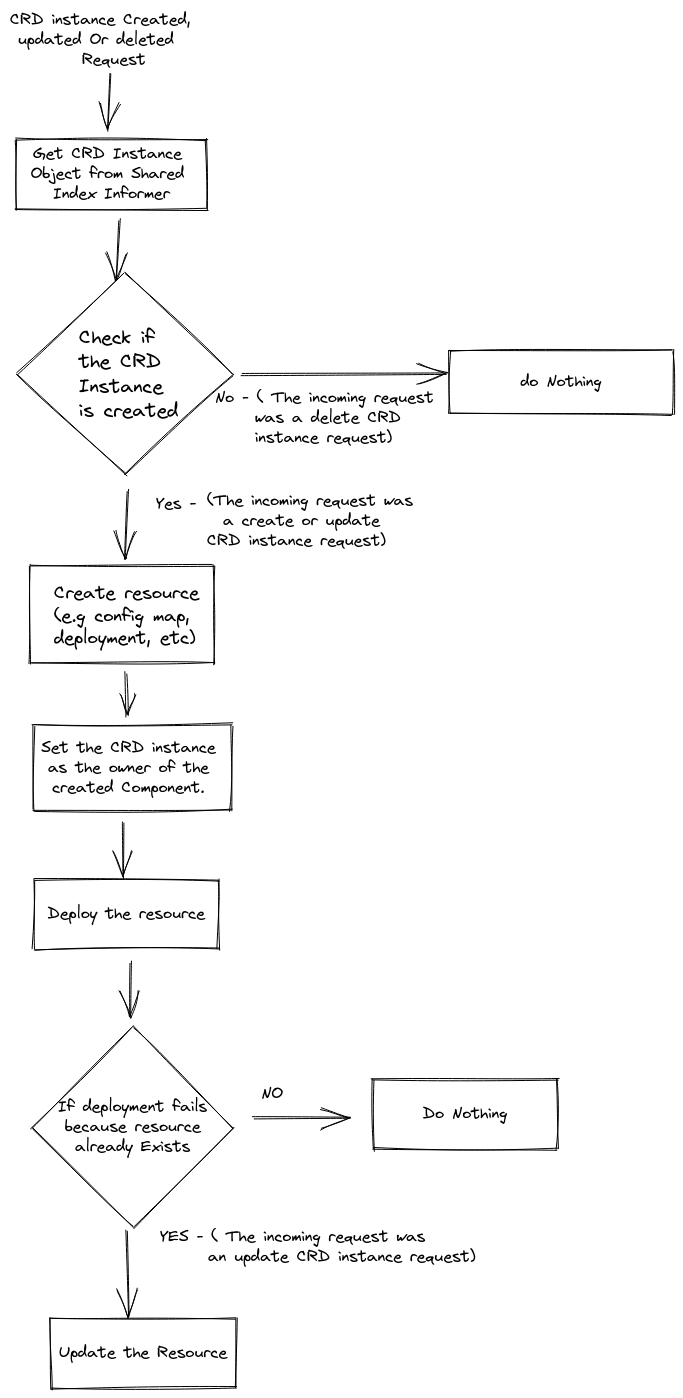
This is the simplest algorithm.
As you can see in the flow chart, there are 3 variants of the incoming requests i.e Create, Update, and Delete.
Let’s look at them.
- Create Instance Request:- When we receive this request, we get a reference to the resource instance from the index informer. We can then do something like creating a config map. Now, when we create a new resource as a result of CRD instance creation, we need to set the current CRD instance as the owner of the new resource. Why? we will find out soon.
- Update Instance Request: In this case, we get an updated reference of the CRD instance and we perform an update on our components i.e. update the previously created config map.
- Delete Instance Request: In this case, we don't have to do anything. As soon as we delete the CRD instance, Kubernetes automatically deletes all the resources it owns. This is why we set the ownership while creating a new resource.
Implementing the Reconciler Component
Let’s look at the reconciler code in two parts.
request -> {
    String key = request.getNamespace() + "/" + request.getName();

    V1MyCrd resourceInstance = shareIndexInformer
            .getIndexer()
            .getByKey(key);

    if (resourceInstance != null) {

        V1ConfigMap v1ConfigMap = createConfigMap(resourceInstance);

        try {
            coreV1Api.createNamespacedConfigMap(request.getNamespace(),
                    v1ConfigMap,
                    "true",
                    null,
                    "",
                    "");
        } catch (ApiException e) {
Here, when the request that comes in just contains the namespace and the name of the resource that was created. We then fetch the reference to the CRDS instance using the shared index former. If the instance was created, we would get a reference, or else it will be null indicating the instance was deleted. Once we get the reference, we then create a Kubernetes config map using the CoreAPI.
Let’s look at the config map creation function.
private V1ConfigMap createConfigMap(V1MyCrd resourceInstance) {
    return new V1ConfigMap()
            .metadata(new V1ObjectMeta()
                    .name("my-config-map")
                    .addOwnerReferencesItem(new V1OwnerReference()
                            .apiVersion(resourceInstance.getApiVersion())
                            .kind(resourceInstance.getKind())
                            .name(resourceInstance.getMetadata().getName())
                            .uid(resourceInstance.getMetadata().getUid())))
            .data(Map._of_("amrut", "prabhu"));
}
If you see here, I create a new config map object and set the reference of the current CRD instance as the owner of the config map.
Now let’s look at what happens during the update.
} catch (ApiException e) {
    System._out_.println(e);
    if (e.getCode() == 409) {
        try {
            coreV1Api.replaceNamespacedConfigMap("my-config-map",
                    request.getNamespace(),
                    v1ConfigMap,
                    "true",
                    null,
                    "",
                    "");
        } catch (ApiException ex) {
            throw new RuntimeException(ex);
        }
    } else {
        throw new RuntimeException(e);
    }
}
When we receive an update, the index informer just gives us a reference to the updated CRD instance, and we still don't know if the incoming request is for a create or update.
So we proceed with a normal create approach, which fails by throwing an exception with a code 409, which means the resource is already created. We then know that the current request is an update and update the config map.
In the case of the delete, we don't have to do anything. Kubernetes will automatically delete all the resources owned by our CRD instance.
This is the reason we need to set the CRD instance as the owner of all the resources we created while handling the CRD instance creation request.

Conclusion
Today we created a Spring Boot Kubernetes controller and handled requests for our own Kubernetes CRD instance creation, update, or deletion.
This article is largely inspired by a presentation from Cora Iberkleid and Josh Long at the Spring IO conference.
You can find the entire code on my GitHub repo here.
I keep exploring and learning new things. If you want to know the latest trends and improve your software development skills, then subscribe to my newsletter below and also follow me on Twitter.
Enjoy!!