
- Published on
Implementing GraphQL APIs in a Spring Boot Application

- Authors
- Name
- Amrut Prabhu
- @amrutprabhu42

Introduction
In recent days, GraphQL has been getting some traction in building backend APIs. It provides a flexible way for clients to request data that it needs, strictly typed interfaces to query data, and better error handling than REST.
GraphQL has its own advantages over the REST APIs such as
- Requesting only what is required and not everything.
- Preventing a cascade of calls to get the required data.
- The client does not need to choose the REST path to fetch different resource data.
- It helps in reducing the amount of data transmitted.
These are just some of the advantages.
Today we will look into how we can provide GraphQL APIs with a Spring Boot application
Creating an Application
Let’s go to https://start.spring.io and create an application with the following dependencies
- Spring Boot Starter GraphQL.
- Spring Boot Starter Data JPA. ( only for storing data )
- H2 database.
Defining a GraphQL schema
Let’s define a GraphQL schema providing a simple query API.
type Person {
  id: Int!
  name: String!
  address: [Address]
  phone: String
}

type Address {
  type: AddressType!
  street: String
}

enum AddressType {
  PRIMARY
  SECONDARY
}

type Query {
  person(id: Int!): Person
}
Here we have a type Person that has a nested type Address . We then provide a simple query API, wherein we can fetch a Person based on the id. The ! next to the type definition defines the attribute as mandatory.
Next, let’s add the ability to edit data using mutation.
input AddressInput {
  id: String!
  personId: Int!
  type: AddressType!
  street: String!
}
input PersonInput {
  id: String!
  name: String!
}

type Mutation {
  createPerson(person: PersonInput): Person
  createAddress(address: AddressInput): Address
}
Here, we have separated creating the address from creating the person. This is just to keep things simple. You can always combine the creation of a person with an address. For this, you will have to define the address field with the type AddressInput . This is because mutation works with only input types.
With the schema defined, let’s put it under the folder graphql in the resources directory with a file name schema.graphqls . Spring automatically reads the schema files with the extension *.graphqlsunder the graphql folder.
Now with the schema in place. Let’s create our classes.
Defining Domain Classes and Repository.
To keep things simple, we will be directly using the domain classes in the GraphQL interface.
@Entity
public class Person {

    @Id
    private Integer id;
    private String name;

// Getters and setters omitted

}

@Entity
public class Address {

    @Id
    private Integer id;
    private Integer personId;

    private String street;
    private AddressType type;

// Getters and setters omitted
}

public enum AddressType {
    PRIMARY,
    SECONDARY
}
Finally, we have the two repositories as below.
public interface PersonRepository extends JpaRepository<Person, Integer> {
}

public interface AddressRepository extends JpaRepository<Address, Integer> {

    List<Address> findByPersonId(Integer personId);
}
For the address repository, we are defining an extra method findByPersonId to get the address related to a person.
With this defined, let’s look at implementing the GraphQL APIs
Implementing GraphQL Query APIs
Let’s define our APIs for querying data.
@Controller
public class GraphQLController {

    @Autowired
    private PersonRepository personRepository;

    @Autowired
    private AddressRepository addressRepository;

    @QueryMapping(value = "person")
    public Optional<Person> getPerson(@Argument(name = "id") Integer id) {
       return personRepository.findById(id);
    }

    @SchemaMapping
    public List<Address> address(Person person) {
        return addressRepository.findByPersonId(person.getId());
    }
Here, we have defined APIs for handling query requests. The function with @QueryMapping annotation becomes the handler for a query. The query name is automatically mapped to either the function name or you can define it explicitly using the value parameter of the @QueryMapping interface which in this case is person. We then define the input using @Argument annotation specifying the name of the argument.
The @SchemaMapping becomes the handler for the fields inside the query. The mapping is based on either the function name itself as shown above or by setting thevalueparameter as shown below.
@SchemaMapping(value = "address")
public List<Address> getAddress(Person person) {
    System.out.println("Fetching address");
    return addressRepository.findByPersonId(person.getId());
}
Defining GraphQL Mutation API
Let’s look at how we can define mutation operations.
@MutationMapping(name = "createPerson")
public Person addPerson(@Argument(name = "person") Person person) {
    return personRepository.save(person);
}

@MutationMapping(name = "createAddress")
public Address addAddress(@Argument(name = "address") Address address) {
    return addressRepository.save(address);
}
Here, we follow the same principle as the @QueryMapping annotation. We use the @MutationMapping annotation to map the mutation name to the handler.
With this, we have all the handlers in place.
Enabling GraphiQL UI
To make GraphQL requests, Spring Boot GraphQL provides a GraphiQL UI already built-in with which we can play around with our APIs
To enable it we need to set the following property.
spring:
  graphql:
    graphiql:
      enabled: true
With this, you can access the UI on the path /graphiql . It will automatically pull in the schema in the resources directory to assist you in validating the GraphQL requests.
The UI provides nice features like autocompletion and schema documentation that will help to create your requests easily.
With this, let’s start the application and query data.
Querying Data with GraphIQL
We can access the GraphiQL interface at the path /graphiql .
Before we query data, let’s first store some data using mutation.
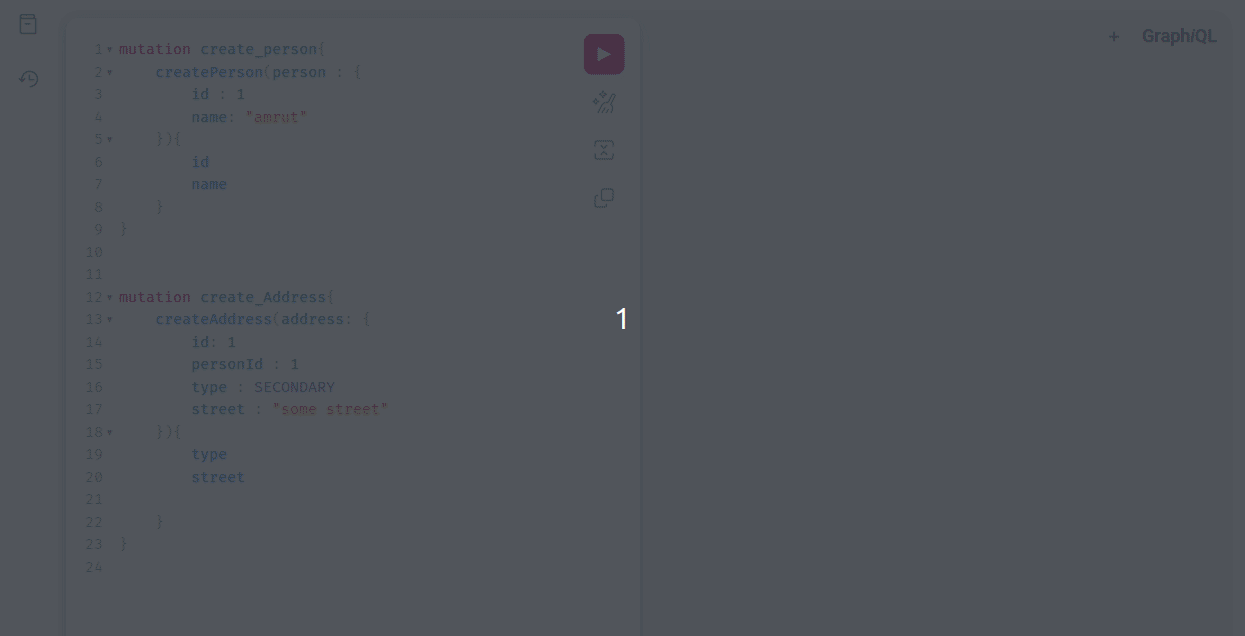
mutation create_person {
  createPerson(person: { id: 1, name: "amrut" }) {
    id
    name
  }
}

mutation create_Address {
  createAddress(address: { id: 1, personId: 1, type: SECONDARY, street: "some street" }) {
    type
    street
  }
}
Here, we are making two mutation requests, one to create a person and one to create an address.
The first mutation creates a person and returns only the id and name as we are only interested in those two attributes. Similarly, it returns the type and the street for the address mutation.

Now, let's query the data that we just stored.
query get_person {
  person(id: 1) {
    id
    name
    address {
      type
      street
    }
  }
}

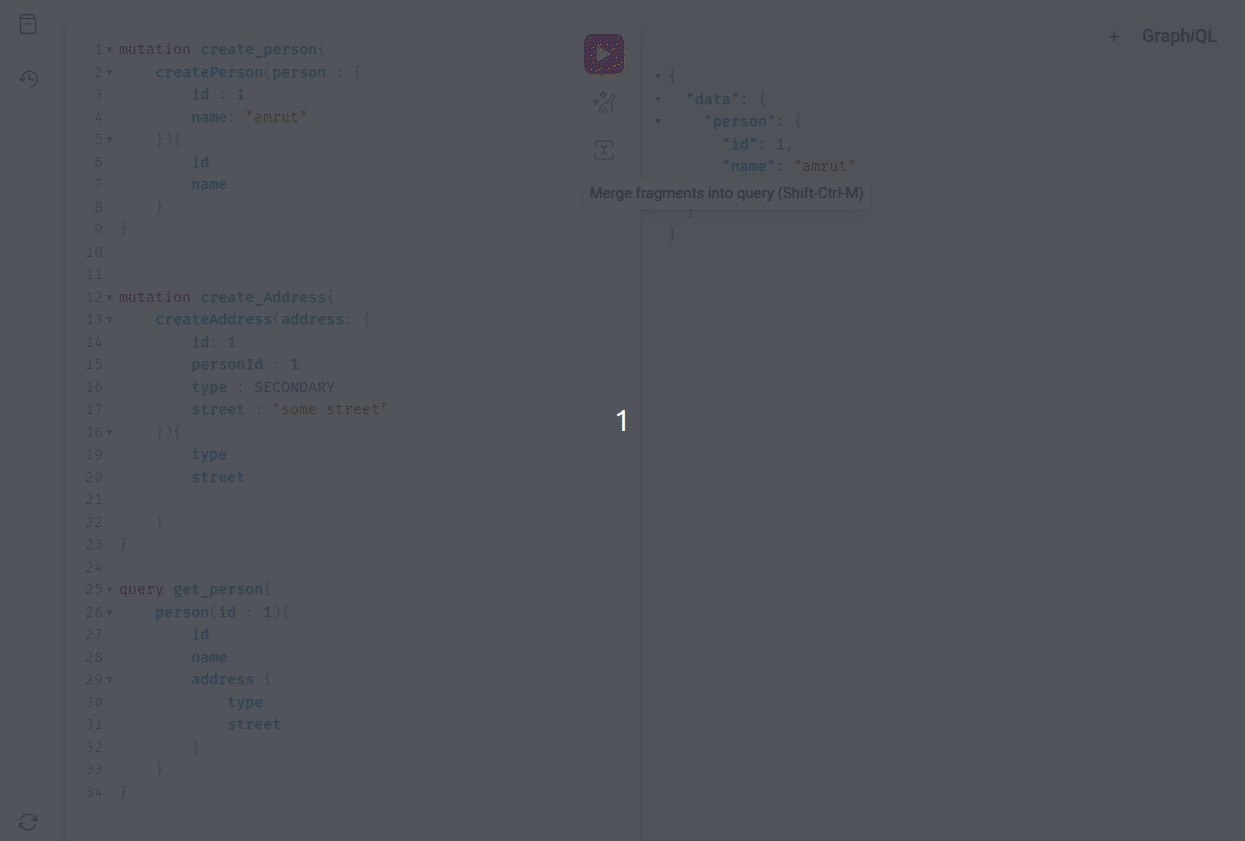
With this, we just saw how we can add and query data with GraphQL using Query and Mutation operations.
GraphiQL internally makes a POST call to the endpoint /graphql to sent the query. Hence you can also do this using a curl command.
curl --location --request POST 'http://localhost:8080/graphql' \
--header 'Content-Type: application/json' \
--data-raw '{"query":"query get_person{ person(id : 1){ id  name }}"}'
You can always change this default path using the property spring.graphql.path
Let’s look at how errors are handled.
GraphQL Error Handling
Let's first look at what happens when we have an error.
For this, we will create a handler for a phone field that throws an exception when invoked.
@SchemaMapping(value = "phone")
public String getPhone(Person person) {
    throw new RuntimeException("Did not find phone data");
}
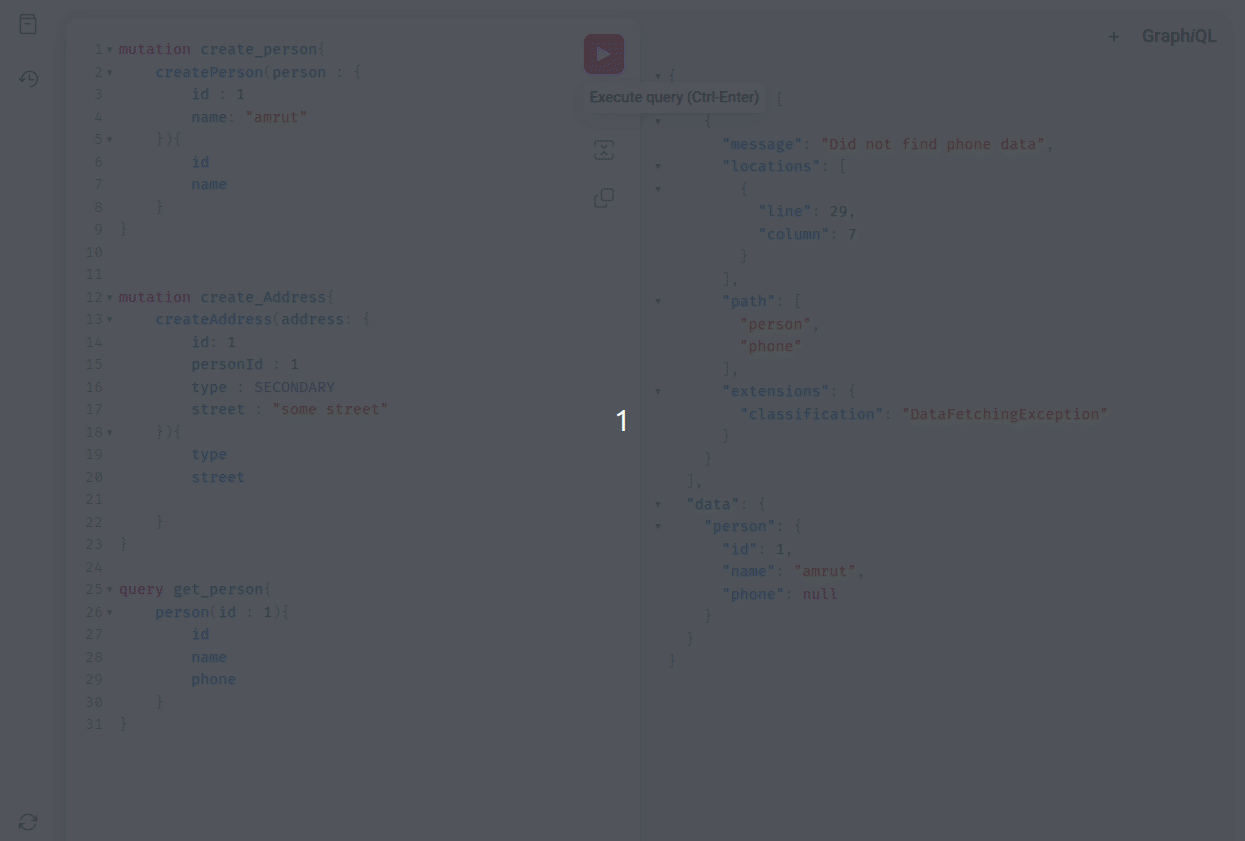
Now, let’s make a query with the phone field.
query get_person {
  person(id: 1) {
    id
    name
    phone
  }
}
When we request this, we get the following output.
{
  "errors": [
    {
      "message": "INTERNAL_ERROR for e7f58f69-e800-0622-1374-046bff96d0cb",
      "locations": [
        {
          "line": 29,
          "column": 7
        }
      ],
      "path": ["person", "phone"],
      "extensions": {
        "classification": "INTERNAL_ERROR"
      }
    }
  ],
  "data": {
    "person": {
      "id": 1,
      "name": "amrut",
      "phone": null
    }
  }
}
The errors array contains a list of errors from various data fetchers. Each error has an error message, a path, and a location in the query where the error occurred indicating which field caused the error.
Now the above values are returned using the default error handler.
We can customize how errors are returned by creating our own error handler resolver.
@Component
public class ErrorHandlerResolver extends DataFetcherExceptionResolverAdapter {

    @Override
    protected List<GraphQLError> resolveToMultipleErrors(Throwable ex, DataFetchingEnvironment env) {
        GraphQLError build = GraphqlErrorBuilder.newError(env)
                .message(ex.getMessage())
                .build();
        return Arrays.asList(build);
    }
}
Here we have a custom error handler with an exception and a reference to the data fetching environment metadata with which you can get additional information like the location and path where the error occurred.
With this handler in place, the error now looks like this.
{
  "errors": [
    {
      "message": "Did not find phone data",
      "locations": [
        {
          "line": 29,
          "column": 7
        }
      ],
      "path": ["person", "phone"],
      "extensions": {
        "classification": "DataFetchingException"
      }
    }
  ],
  "data": {
    "person": {
      "id": 1,
      "name": "amrut",
      "phone": null
    }
  }
}
With this, we just looked at how we can use GraphQL to query data, change it and also define a custom error handler.
Let’s write an Integration test for this.
GraphQL Integration Test
Spring Boot GraphQL provides very good support for writing integration tests. Let’s look at how we can write one.
@SpringBootTest
@AutoConfigureGraphQlTester
public class PersonGraphQlTest {

    @Autowired
    private GraphQlTester graphQlTester;

    @Test
    void shouldAddPersonAndQueryBack() {
        this.graphQlTester.documentName("person-mutation")
                .execute()
                .path("createPerson.name")
                .entity(String.class).isEqualTo("amrut");

        this.graphQlTester.documentName("person-query")
                .variable("id", 1)
                .execute()
                .path("person.name")
                .entity(String.class).isEqualTo("amrut");
    }
}
Here, we have a simple test, that makes use of mutation to add data and then query it using the query operation.
The document name “person-mutation” and “person-query” are GraphQL files present in the resources directory under the folder graphql-test
Here is what the person-mutation.graphql looks like
mutation create_person {
  createPerson(person: { id: 1, name: "amrut" }) {
    id
    name
  }
}
and the person-query.graphql looks like
query get_person($id: Int!){
    person(id : $id){
        id
        name
    }
}
Since we are using a variable $id to pass data from the test, we have to define the type of variable. Hence as part of the query name, we define the variable type in the arguments.
If you want to write good, reliable, and effective tests and want to know about how you can test your application in various ways, I would highly recommend the course “Testing Spring Boot Application Masterclass” by Philip Riecks.

This course provides you with a comprehensive guide on how you can start and grow your knowledge on writing effective tests for your Spring Boot application.
Conclusion
We saw how we can provide GraphQL APIs using a Spring Boot Application. We defined a schema, provided APIs, and even wrote an integration test.
The entire code is uploaded to my GitHub repo here.
I keep exploring and learning new things. If you want to know the latest trends and improve your software development skills, then subscribe to my newsletter below and also follow me on Twitter.
Enjoy!!